V-Ray for 3ds max – Simple “spectral” metallic setup

Software:
3ds max 2020 | V-Ray 5

Note:
This material setup is using V-Ray 5, but will also work for V-Ray next,
And in previous versions, not having the Metallic property, it can be implemented by unchecking Fresnel Reflections and setting the color through the Reflection color.
This technique can also be implemented in V-Ray for other 3D software like V-Ray for Maya etc.

The idea is simple:
Use a VRayBlendMtl to additively combine 3 anisotropic metallic materials,
Each of which reflects a pure primary RGB color, but has a slightly different anisotropic angle.
The additive combination creates an anisotropic reflection that “spreads” the color of the spectrum.
Note that in this example we use Anisotropic Rotation values of 0, 8, 16, but this may change with different roughness and anisotropy values.

For the materials Diffuse Color property we set levels that will combine to create the general brightness and tint of the metal, and the materials Reflection Color is set to 100% so they will combine to pure white reflection at grazing view angle.
For example, if you want the general metallic color to be a yellow RGB: 255, 186, 57, than the first red metallic component material would have a Diffuse Color of 255,0,0, the second green metallic component material would have a Diffuse Color of 0,186,0, and the third material, that adds the blue metallic component would have a Diffuse color of 0,0,57, so the combined blend will have the desired general color.
More info about the VRayMtl Metalness parameter


Related:

  1. V-Ray Next Metalness
  2. Fresnel Reflections
  3. V-Ray Next’s PBR compatibility

V-Ray Next’s PBR’ness

Software:
3ds max 2019 | V-Ray Next

A quick test of V-Ray Next‘s PBR* workflow,
Namely designing materials while previewing them using V-Ray,
Defining the material properties using the new (to V-Ray) Metalness attribute, and using Roughness rather than Glossiness, shows good results IMO.

* It should be noted that although we got used to referring to the base-color / metallness / Specular material interface as “PBR”, it is actually a principled material interface developed by Disney animations studios.

Results are generally consistent through Blender & Cycles, Maya & Arnold, and UE4.

Untitled-1.jpgUntitled-3

Untitled-4

Untitled-2


Related Posts:

  1. V-Ray Next – Metalness
  2. Metal In UE4
  3. Fresnel Reflections

Complex Fresnel texture for Cycles

Software:
Blender 2.79 | Cycles Renderer

The most realistic way to create real world metal shaders is to use Complex Fresnel reflection.
Cycles has a general implementation of a Complex Fresnel reflection in its Principled shader (when Metallic is set to 1.0), but this implementation doesn’t allow using real world physical numeric Complex IOR values in order to accurately render physical metals.

You can use a Complex IOR OSL shader such as this one from Chaos Group,
But there are some limitations with it:
1) It isn’t supported in GPU rendering.
2) For some reason I don’t know I couldn’t get it to work with Cycles..

Seeing these limitations I decided to develop a Complex Fresnel/IOR texture for Cycles that will work on GPU, and your welcome to download it here on my studio’s website:
https://cg-lion.com/2018/07/08/free-complex-fresnel-texture-for-blender/

The blend file itself contains a text with some Complex IOR preset values for metals,
And you can get more physical IOR data from refractiveindex.info

Enjoy! 🙂

BlenderNation

Related:

  1. Fresnel Reflections
  2. Metallic shading in V-Ray Next
  3. Create rich metal in UE4 
  4. Customizable Photo-realistic Car-paint shader for Cycles


VRayMtl’s new metallic goodness

Software:
3ds max 2019 | V-Ray Next | V-Ray next GPU

In V-Ray Next (4) for 3ds max, a new Metalness parameter has been added to the Reflect parameters of the VRayMtl material.
This allows for easy creation of realistic metal materials and also effectively enables a PBR workflow with V-Ray.

When the Metalness parameter is set to 1.0, the material becomes completely reflective, the Diffuse color controls the general reflection color, and the Reflect color (which should generally be set to white) controls the reflection color at grazing incidence angle.

The IOR parameter still controls how fast will the main reflection color (set by the Diffuse color) blend into the Reflection color, and I don’t know whether some form of complex Fresnel has been implemented or if it’s just a dielectric simple Fresnel blended over a reflective surface.

An excellent article on the new Feature from the Chaos Group blog:
https://www.chaosgroup.com/blog/understanding-metalness

VRay_Next_Metalness

Related:

  1. Fresnel Reflections
  2. Complex Fresnel for Blender & Cycles
  3. Metal material in UE4


Cycles Tangent node & Anisotropic reflection

Software:
Blender 2.82

The Cycles Tangent node defines a Tangent-Space for a mesh by either using one of the object’s local axes (see image A) or by using an available UV layout.
This can be useful when designing an Anisotropic reflection shader like in the case of brushed, machined or lathed metals.
A grey-scale texture can be connected to the Rotation input of the shader to define changes in the Anisotropic direction on the surface (see image B).

Examples:

A. In this example the Tangent node is set to ‘Radial’ Direction mode, in which a object axis is chosen as the radial axis of the Anisotropic direction:
Annotation 2020-05-07 132452

B. In this example a Noise texture’s Factor output is connected to the Anisotropic shader’s Rotation input to create an irregular Anisotropic (metal brushing finish) direction:

Annotation 2020-05-07 133126


Related:

  1. Adding a texture to an Area Light
  2. Using the normal’s blue channel to create top-side effects
  3. Nested transparencies

Create a richly colored metallic surface in UE4

Software:
Unreal Engine 4.18

One of the optical properties of many metallic surfaces is changing it’s color slightly as the surface viewing angle changes.
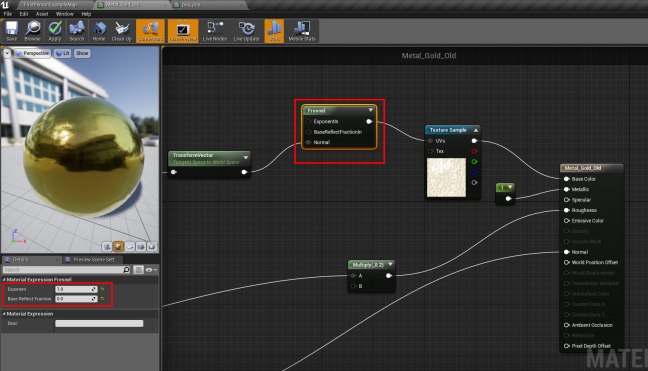
This effect can be simply created using a Fresnel node and a color-ramp texture.

Untitled-4

  1. Create a metallic material (metallic value of 1.0).
  2. Use an image editing software to create a linear color ramp texture (gradient) of the color change per viewing angle from left to right. like this example for a golden metal, and import it to your project.
    Ramp_Gold
  3. Add the ramp texture to the material Blueprint, and connect it to the material Base Color Input.
  4. Create a Fresnel node and set its Exponent value to 1.0 and its Base Reflect Fraction to a value of 0.0 so it will provide a linear angle blend value.
  5. Connect the Fresnel node’s output to the UVs input of the ramp texture node.
    * the reason the Fresnel node can be providing both the X and Y texture coordinates is that the texture’s Y dimension provides the same color for all values anyway.

Note:
When the Metallic property of an Unreal Engine material is set to 1.0, the material automatically simulates the metal’s color fading to white at parallel surface viewing angle (the sides) like it should.
So using a Color Ramp Texture like in this example creates an amplified effect.
* Simply put: You don’t have to have the Color Ramp fade to white on the right side of the texture..

Untitled-4

Untitled-3