While the model import settings > ‘Generate Lightmap UVs’ tool-tip says:
“Generate lightmap UVs into UV2“
The UV channel annotation in editor is 1-based rather than 0-based, so, in the shader graph, you may think you got access to your mesh’s original, uv1 channel, but it’s actually overridden by by a lightmap UV.
I’m not sure whether this issue is about different settings between VS 2019 and 2022, or old project source folder structure ported to a new VS project, But I encountered an annoying problem, of newly generated class files that can’t include or be included by other classes that already exist in the project. Forgetting that the VS explorer window doesn’t display the actual folder structure, it took me some frustrating investigation to find out, that a new class was simply added to the root folder of the project, rather than the ‘Source’ folder within the project folder, where all the other classes are found.
Fix the problem for an existing class:
Move the new files manually to the correct location, and either drag the file on the “Source Files” filter in the Solution Explorer window in Visual Studio, or manually update the .vcxproj file with the new path: The example in this image shows a new class named ‘baba’, that was moved from the root folder to the ‘Source’ folder, so the path was updated accordingly:
Creating a new class:
In the add new class dialog, Press the file path button for the .h and .cpp files, and select the wanted folder. Note: This may be confusing, as after selecting the path, the dialog doesn’t reflect your selection, but it works.
Fun fact?
I did some searching and.. It seems you can’t set the default location for new classes in a VS C++ project.. If you know otherwise, I would be very grateful if you’ll add a comment about this.
Some notes on defining classes with mutual references to instances of each other:
The classes can’t hold the actual other class’s instance data, because that could potentially cause an infinite expansion memory allocation, so by definition, the classes should be defined to contain pointers to the instance of the other class.
The classes C++ header files can’t be including each other (it will cause a compile error), because, this is literally telling the compiler to endlessly read the files, each one including the other. So only one class header can have an “include” statement pointing to the other.
In order to successfully compile the class header file which doesn’t contain an “include” statement for the other class, a forward declaration of the other class is needed. I.E. a ‘ghost’ declaration of the class at the beginning of the file, just so the compiler ‘knows’ there is such an entity, and doesn’t throw an error.
Class A code:
#include "B.h"

class A
{
    B* TheB;
};
Class B code:
class A;

class B
{
    A* TheA;
};
Hope this was helpful! If you find mistakes or inaccuracies in this post I’ll be very grateful of you share them with me in the comments.
When sampling textures using an HLSL custom node, The UE4 TextureObject input name, will automatically have a sampler object generated named:
<your TextureObject name>sampler
For example, if you named your TextureObject input “tex_in”, the available sampler will be named “tex_insampler”. So the code for sampling the texture will be:
Texture2DSample(tex_in, tex_inSampler, coords);
The following is an example of a simple u-blur custom node code, with 4 node inputs: 1. tex_in – TextureObject 2. coords – float2 3. size – float 4. sample – float
int blur_samples = int(samples * 0.5f);
float3 col = 0.0f;
float2 sample_coords = 0.0f;
for (int i = -blur_samples; i < blur_samples; i ++)
{
	sample_coords.x = i * (size / blur_samples * 2);
	col += Texture2DSample(tex_in, tex_inSampler, coords + sample_coords ) / (blur_samples * 2);
}
return col;
When having to develop a UE4 project that deals with a tiny world scale, like the whole level being less the 50cm size for example, The following steps may help make the project more easily navigate-able and convenient to work on.
Scale down the camera Icon: UE4 has by default a huge, bulky, opaque camera icon. For a tiny scale project, this camera icon may cover the whole level and be very inconvenient to work with. Select the relevant camera component and scale it down. In my tests, this modified camera matrix isn’t breaking the camera optics in any way, But if you want to have no such scale offsets in your project, you can also replace the camera icon with a suitable small one.
In Editor Preferences > Viewport: Decrease both: Mouse Scroll Camera Speed and Mouse Sensitivity To allow finer navigation at small scale
Note: A global scale conversion factor can be used instead of taking these measures, And in many cases this can be a more practical solution for managing a sub 50cm world, For example, building everything 100X size so that 1 meter will be representing 1 centimeter in your project’s world. But take into account, that if the project demands rendering realistic physical lighting and optics, extra conversions will have to be made to account for the scale conversion factor, so is such cases it may be better to setup a real-world scale project.
Note: This seems like an awkward workaround.. So if I missed something here, and there’s a better method to do this, I’ll be very grateful is you share it in the comments. Also, The following tip is only relevant for the CineCameraActor and won’t work with a regular CameraActor as it has a different built in offset (hopefully, I’ll have time to add this to the post later..)
Replacing the camera icon: Its fairly simple to replace the Camera component’s mesh icon, Just select the component and replace it’s Camera Mesh Static Mesh component with a different static mesh object:
So what’s the problem? The problem is that the default mesh used for the camera icon doesn’t have its natural pivot at the focal point of the camera, but at its bottom somewhere, And there is a hardcoded transform offset that compensates for that and places the icon mesh in a way that has the Icon lens roughly at the actual Camera actor pivot / focal point: * I haven’t found any exposed transform parameter that allows moving the icon itself without moving the camera. So in-order to replace the camera mesh with an alternative icon mesh, and have it be aligned properly to the camera’s pivot / focal point (without changing engine code and building it) the built-in offset must be negatively pre-added to the new mesh model: In this example in Blender, a new icon is modeled facing positive Y, with pre-built offset to compensate for the hardcoded offset in UE. The Camera actor with the alternative Icon:
Note: In this example, I’ve replaced the camera icon with a much smaller model, intentionally, to suite a tiny scale project, You can also scale the icon without replacing the model.
To import an external Python module, Add its folder path to the sys.path list, Then import the wanted code.
In this example, there is a Python file: C:\Oded\GoogleDrive\CGL_Studio\CGL_Python\py\cgl_pixel_utils.py Containing a function: cgl_fill_int_range
The following Python code checks the path isn’t already found in sys.path, and if so adds the module path to sys.path, Imports the cgl_fill_int_range function for the cgl_pixel_utils module, And calls the cgl_fill_int_range function:
import sys

modulepath = r"C:\Oded\GoogleDrive\CGL_Studio\CGL_Python\py"

if modulepath not in sys.path:
    sys.path.append(modulepath)

from cgl_pixel_utils import cgl_fill_int_range

print(cgl_fill_int_range(-3, 3))
To force reloading of an external module, Use the reload function from the built-in imp module. Note that this works with importing full modules and not just specific functions:
import sys
import imp

modulepath = r"C:\Oded\GoogleDrive\CGL_Studio\CGL_Python\py"

if modulepath not in sys.path:
    sys.path.append(modulepath)

import cgl_pixel_utils

# Force reload of cgl_pixel_utils:
imp.reload(cgl_pixel_utils)

print(cgl_pixel_utils.cgl_fill_int_range(-3, 3))
the function doesn’t return the numeric value of the price, but instead, creates a table (see image below):
This seems like a nice feature.. so what’s the problem? If you need to use the conversion rate within a larger scope calculation, the return value will be the string “Date” instead of a numeric value representing the conversion rate, and that will cause an error:
So.. what’s the solution? The solution is to use the index function to retrieve the wanted value from the table returned by GoogleFinance. In this case index(weird_surprising_tabel,2,2) returns the wanted value:
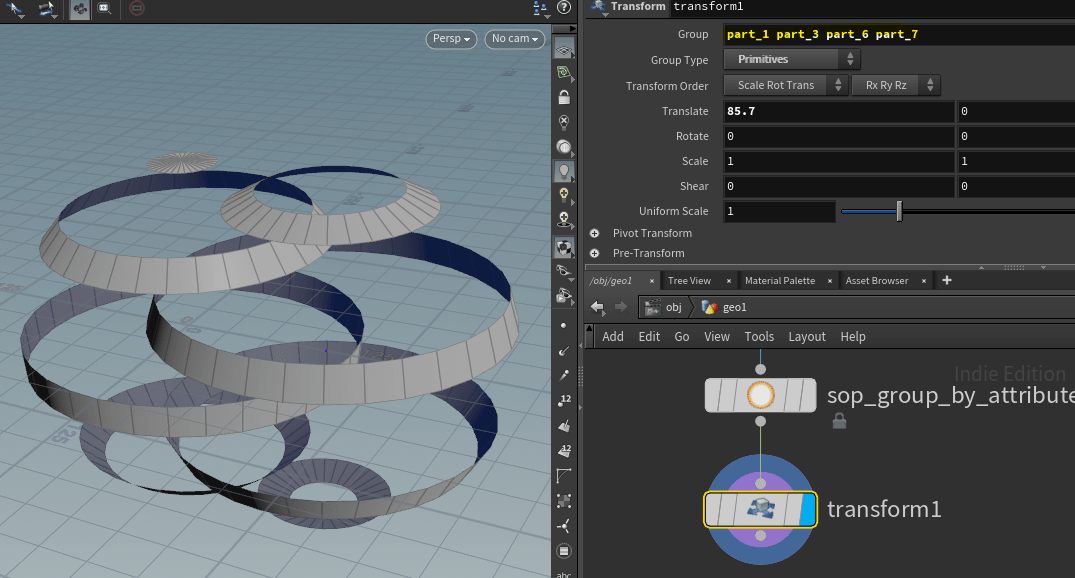
Separate a mesh to groups by continous parts (elements):
Use the Connectivity SOP node to assign each mesh primitive an integer attribute based on the continuous mesh element in belongs to. This attribute can be named “element” or “part” for example.
Use the GameDev Group by Attribute* node to assign each mesh primitive to a different group according to its “part” attribute (if you named it “part” that is..). Set a group name prefix, like “part_” or “element_”. the node will generate numbered groups per each mesh part like so: “element_0”, “element_1”, “element_1″….
Use this group separation as a filter to create whatever part-selective effect you need.