Blender to Unreal Engine tips

Software:
Blender 2.9 | Unreal Engine 4.25

The following is a list of guidelines for preparation and export of 3D content from Blender to Unreal Engine 4 via the FBX file format.

Disclaimer:
This is not a formal specification.
It’s a list of tips I found to work well in my own experience.
* Some of the issues listed here may have already been solved


Blender Scene and model settings:

System units in Blender:
Define the scene units in Blender as:
Metric unit with 0.01 scale (centimeters)
And model your content correctly using centimeter units.
* Modeling in 1 meter units may seem to be imported correctly into UE4 but will cause unsolvable problems like a skeletal mesh physics asset having incorrect auto-generated shapes, a problem that in my experience can’t be fixed manually.

Transform:
Model your model in Blender facing the -Y world axis, +Z obviously being up (obviously for Blender).
* This way the model is aligned to Blender’s views so the front view displays the model’s front etc.
Make sure to apply your model’s transformations before export.

Armatures:
Make sure the Armature object isn’t named “Armature”.
naming or leaving the Blender skeleton named “Armature” will cause the UE4 importer to fail due to “multiple roots”.
* Also remember some weird related bug with animation scale incorrectly imported, but can’t confirm this now..
No need for a dedicated root bone in the hierarchy. the Armature object is the root of the bone hierarchy.
* See export option below

Texture baking:
Set the normal map’s green channel to -Y.
* This is not critical at all because if baked as +Y it can easily be fixed in UE4.

Metadata:
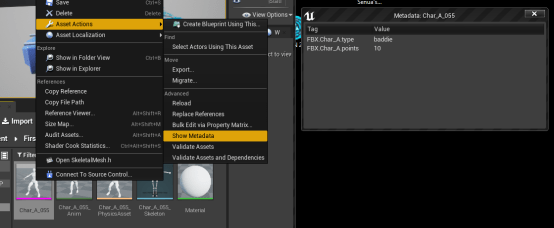
Blender custom properties import as UE4 asset metadata that can be read by editor scripts for automation purposes.
* See export option below

FBX Blender export and UE4 import settings:

I recommend saving an FBX export preset with these settings.

Optional:
I prefer the export settings to include only selected objects.
* It’s more efficient for me to select the specifics objects I want to export into a single FBX file prior to export, than to delete all the temp / reference / draft objects from the scene.
If you want to export Blender custom properties with to the FBX check the “Custom Properties” option

Axes:
Blender’s native model/world orientation is model’s forward facing the -Y axis, left side facing +X and of-course up facing +Z.
UE4’s native model/world orientation is model’s forward facing the +X axis, left side facing -Y and up facing +Z.
There are axis settings in Blender’s FBX export module, that theoretically, should be set like this:

However, in tests I did, The axis settings made no difference when importing to UE4, even when setting intentionally incorrect upside-down axes.
Maybe the FBX exporter writes these settings to metadata that the UE4 importer doesn’t read..
From my experience, what’s important is to orient the model correctly in Blender (see above), apply the transformations,
And in the UE4 import menu, check the “Force Front XAxis” option:

Geometry:
Make sure either “Edge” or “Face” is chosen in the “Smoothing” option to import the mesh’s smooth shading correctly ans avoid a smoothing groups warning on import:

Optional:
Depending on how much control you need over the mesh’s tangent space,
You may want to check the “Tangent Space” export option,
This will make Blender export the full tangent space to the FBX and make UE4 read it from FBX instead of generate it automatically.
* For this option to be supported, the mesh geometry must have only triangle or quad polys.
In the UE4 import settings, choose the “Import Normals and Tangents” option in “Normal Import Method”:

Armature:
Set “Armature FBXNode Type” to “Root”.
Uncheck the “Add Leaf Bones” option to avoid adding unneeded end bones.
Set bones primary axis as X, and secondary axis as -Z.

Animation:
Uncheck “All Actions” to avoid exporting actions that don’t actually belong to the skeleton.
* Un-related animations in the FBX can also corrupt the character rest pose in UE.
The “NLA Strips” option is useful for exporting a library of animations with the skeleton.
* In Blender’s NLA editor, activate the actions you want exported to the FBX.


Related:
3ds max & V-Ray to UE4 Datasmith workflow

Blender – assign different cameras to different view-ports

Software:
Blender 2.79

By default, the view-ports Camera view in Blender displays the view from the camera that is set as the scene’s Active Camera.
If you split the view and in the new view select a different camera and set it as the Active Camera, the view in other view-ports set to camera view will update to display the new Active camera.
In short, by default, it seems you can’t assign different camera views to different view-ports..

But you can…

You just have to unlock the wanted view-port from the scene’s Active Camera by de-activating this button:

Untitled-2

When the Use the scene’s Active Camera and layers in this view button is de-activated, your allowed to set an Active Camera for the specific view-port without changing the scene’s Active Camera setting, therefore not affecting other view-ports displaying the camera view.

Untitled-1

Blender – Select Pattern

Software:
Blender 2.79

Use the Select Pattern tool to select multiple objects with name similarities.

  1. In the 3D View in Object mode choose Select > Select Pattern…
  2. In the Select Pattern dialog, type a part of a name with an Asterisk to define wild cards.
    For example *car* will select all objects who’s names contain the string ‘car’,
    And car* will select all objects who’s names begin with the string ‘car’.

Untitled-1

Untitled-2

Blender – Set Origin (pivot point)

Software:
Blender 2.79

The Set Origin Tool let’s you set the origin (pivot) for one or multiple objects.
Typical usage would be to place the 3D Cursor at the wanted location and choose Origin To 3D Cursor.
Another handy usage is after “breaking” a model into separate meshes, like separating the letters of a title for animation, selecting all the letters and choosing Origin to Geometry to set all the letters origins to their centers.

3D View > Tools panel > Set Origin

Hotkey:
Shift + Ctrl + Alt + C

Untitled-1

Configuring Blender for faster object selection in large scenes

Software:
Blender 2.79

In large scenes, selecting objects becomes slow.
There’s a frustrating lag and the software hangs between the time you Right-Click an object in the view-port, and the time it gets selected.
* especially if there are a lot of mesh surfaces behind it in the view-line of the mouse cursor.

The Systems settings shown below can dramatically improve this.
* You need a GLSL capable video card.

Untitled-1

Blender – Automatically set fake user to items appended form another blend file.

Software:
Blender 2.79

When appending items from a different blend file,
Check the Fake User option to automatically set a Fake User to the items.

This means that appended items that are not used within the file will not be deleted when closing it.
It’s useful for times when you append a whole library of materials or other assets into a file, so that you don’t have to make use off all of them before saving and closing, and they will still be available in the file the next time you load it.
In other words, you wont need to append the assets again the next time if you didn’t make use of them..

Untitled-1

Measure Distance & Angle in Blender

Software:
Blender 2.79

To create and edit measurement Rulers & Protractors:

  1. In the Tool Shelf > Grease Pencil,
    Press Ruler/Protractor to activate Ruler/Protractor mode.
  2. LMB Click & Drag the 3D Viewport to create a measuring Ruler.
    * Hold Ctrl while creating the Ruler to snap its start and end points to 3D elements.
    * If a one or more measuring Rulers already exist, Ctrl must be held anyway to create a new Ruler.
  3. LMB Click & Drag along an existing Ruler line to turn it into a Protractor for angle measurement.
    * Hold Ctrl while creating the Protractor to snap its apex to 3D elements.
  4. LMB Click & Drag a point in an existing Ruler or Protractor to change its location.
  5. LMB Click an existing Ruler or Protractor and Press Delete to delete it.
  6. When finished creating measurement Rulers & Protractors,
    Press Enter to save them for later use of the Ruler/Protractor mode,
    Or Press Escape to discard them (without discarding Rulers / Protractors that were previously saved).

Untitled-1

AAA

2


To Delete all Ruler / Protractor data:
In the Properties Panel > Grease Pencil Layers,
Delete the RulerData3D Layer.

Untitled-2