UE4 – HDRI Environment & Lighting

Software:
Unreal Engine 4.25

Annotation 2020-05-20 162811

Creating HDRI environment backgruond and lighting* in UE4:
Note:
Lighting using a panoramic HDRI background is also referred to as IBL – Image Based Lighting.

* The example HDRIs in this post are from www.hdrihaven.com

  1. Import HDRI environment file.
    Note:
    The file must be saved as a *.hdr file and not *.exr because AFAIK that’s the only way UE4 will recognize it as an HDRI environment and encode it as a Texture Cube (cube map)
  2. Enable the HDRIBackdrop plugin:
    Go to Edit > Plugins
    Type “HDRI” in the search field to locate HDRIBackdrop and enable it.
    * You’l have to restart the UE Editor before using the plugin
    Annotation 2020-05-20 153925
  3. Drag a Lights > HDRI Backdrop object to your level:
    Annotation 2020-05-20 154657
  4. In the HDRIBackdrop details, select the wanted Cubemap:
    Annotation 2020-05-20 155212
  5. > Set the HDRIBackdrop‘s Intensity (self explanatory..).
    > Rotate the HDRIBackdrop around its Z axis to set the environment’s direction.
    > Set the HDRIBackdrop‘s Size.
    * Make it larger than your whole scene,
    And if Use Camera Projection is unchecked make it also large enough so that noticeable objects in the HDRI image will be distant enough as to not move incorrectly when you strife.
    * When Use Camera Projection is activated the Size property has no effect.
    > If Use Camera Projection is unchecked, set the Projection Center Z value to define the background image height below which it is projected as a flat ground.
    > Lighting Distance Factor defines ground projection area that will appear to receive shadows from your scene objects.
    * Set this attribute to 0 in-order to turn off the ground projection shadow.
    > Use Camera Projection:
    Activate this option to get a traditional infinitely far background with no flat ground surface projection.Annotation 2020-05-20 160338


Related:

  1. Sun & Sky link
  2. UE4 Architectural Glazing
  3. 3ds max & V-Ray to UE4 Datasmith workflow
  4. Preparing an FPS project for archviz
  5. UE4 – Archviz Light calculaion tips

UE4 – Change the size of the UI and fonts

Software:
Unreal Engine 4.24

To Change the size of the UI and fonts in the Unreal Editor:

  1. Select:
    Window > Developer Tools > Widget Reflector
    To open the Widget Reflector window
    Annotation 2020-04-23 150847
  2. In the Widget Reflector window, change the Application Scale parameter:
    Annotation 2020-04-23 151022

UE4 – Blueprints – Set Parent Class

Software:
Unreal Engine 4.24

When It comes to OOP inheritance, the best practice is to take a moment to think about code structure and decide which classes should be be extensions of a common super-class. But in a wild hackathon or game-jam, we may be blueprinting too hastily for that, and we may find out different blueprint classes actually have to be child classes of a common parent class after they already exist and have existing blueprints in them.
In this case will have to Set their parent class as a different class than the class we chose when we initially created them, and also create calls to the parent class event functions if needed.

Setting a BP’s parent class:

Click Class Settings, and under Class Options, in the Parent Class drop-down select the wanted parent class (superclass).
Annotation 2020-03-22 131138


Calling the Parent Class’s event functions:

Note:
When creating a BP class that is defined as child class in its creation this is done automatically

  1. Right-Click the current class’s Event icon, and select Add call to parent function:Annotation 2020-03-22 153156
  2. Connect the execution flow graph, and other inputs if necessary:
    Annotation 2020-03-22 161019


UE4 Blueprints – Spawn Actor Transform Note..

Software:
Unreal Engine 4.24

Short version:
When Spawning new actors via the SpanActor Blueprint node, initial transform must be supplied to the SpanActor node, and not defined in the spawned Actor Class’s Blueprint.

Annotation 2020-03-22 131138

Explanation:
Just found out the hard way, that when you spawn an Actor using the SpawnActor blueprint node, the transform data connected to the SpawnActor node is actually applied after the actors Construction Script and BeginPlay Event.
This means any transform you will try to apply in the spawned Actor’s Blueprint will be overridden and therefore not work.

UE4 – Enable complex collision for models

Software:
Unreal Engine 4.21

By default UE4 uses fast simplified convex collision shapes to calculate collision for static mesh actors.
This means that the player or projectiles wont be able to path through holes, openings or doors in the model.

To set complex (concave) collision for a static mesh model:

In Static Mesh editing window, in the details pane, under Collision:
Set Collision Complexity to: Use Complex Collision As Simple

Static_Mesh_Complex_Collision.jpg

This example shows the default behavior for a model that has an opening, neither the projectiles nor the player can pass:

Simple_Collision.gif

In this example collision for the model was set to Use Complex Collision As Simple:

Complex_Collision.gif


Sprite Sheet – Storing animation frames in one texture

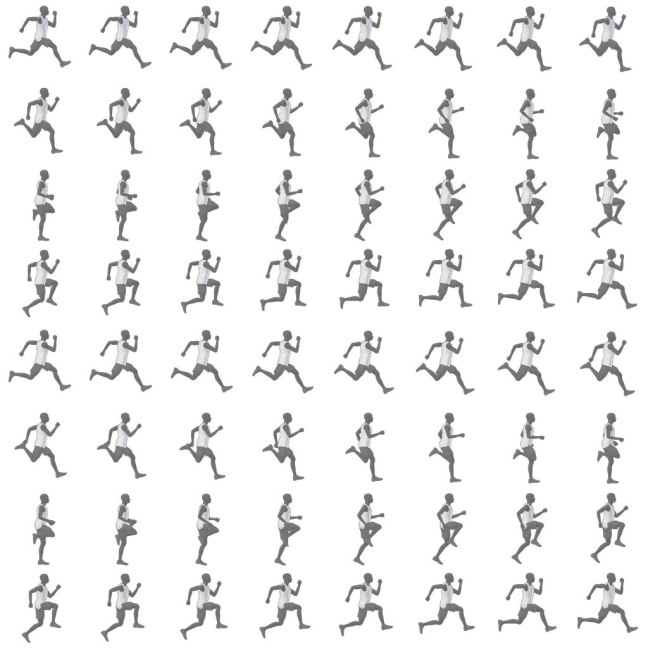
Runner_Atlas

An efficient way to store 2D animation for games is to layout all the frames withing one texture called a ‘Sprite Sheet’ or ‘Texture Atlas’.
This saves resources by avoiding multiple texture loading operations and only animating the UVs of the shader to display the needed image at each frame.
Sprite Sheets are also used to pack various states of game graphics and textures for multiple objects in one file.

Creating Sprite-Sheets:
Sprite Sheets can be created manually using any image editing software,
For an automated process and more control, a specialized software like Texture Packer can be used.
And it can also be done automatically in Adobe Animate (Flash).
* There are many more solutions / scripts that will do that you can find on the web…

3ds max – Unwrap UVW snapping to a defined grid

Software:
3ds max 2018

There are cases where we need to have the UV borders and edges placed precisely on a certain grid. an example of this is when preparing a UV layout intended for baked lightmaps in a game engine, that should preferably be aligned to a 64 by 64 or 128 by 128 grid.

To set the Unwrap UVW editor window grid to 64 by 64:

  1. In the Unwrap Options window:
    Set the Checker display to 64/20 which is 3.2.
    Set the Grid Size to 1/64 which is 0.015625 (the numeric field displays the value rounded to 0.016)
  2. Turn on the grid display in View > Show Grid.
  3. In the Unwrap Snap Settings, make sure Grid Snap is checked.
    * Hold and drag the snap button to open the Snap Settings.
  4. Activate Snap.

Note:
It works only in Vertex selection mode.

UV_Snap.jpg