3ds max – Using a GradientRamp procedural texture in Mapped mode

Software:
3ds max 2020

Using the GradientRamp procedural texture map in Mapped mode can very useful for creating procedural material effects.
The Idea is that the lightness value from a different map will determine what part of the GradientRamp is sampled.

In this example the GradientRamp uses values produced by a procedural Falloff map set to Perpendicular-Parallel mode, as its coordinates source, to create richly colored metal that changes its Hue depending on View/Incident angle:

Annotation 2020-05-02 184426

In this example the GradientRamp uses values produced by a procedural Noise map as its coordinates source to create an irregular color effect:

Annotation 2020-05-02 184849

Note:
The examples here were rendered using V-Ray Next for 3ds max, but this technique could also be used with other rendering engines.


Related:

  1. 3ds max Island/seashore tip

Fusion – Create a Solid color or Gradient element

Software:
Fusion 9

When you need a solid color source or background for your composite,
The Background node is just that,
It provides either a flat color plate or 4 types of gradients (color ramps).
Set the plate fill type in the Color tab of the node’s settings, and the format (size) in the Image tab.

Add Tool > Creator > Background

Untitled-1

Untitled-2


Create a richly colored metallic surface in UE4

Software:
Unreal Engine 4.18

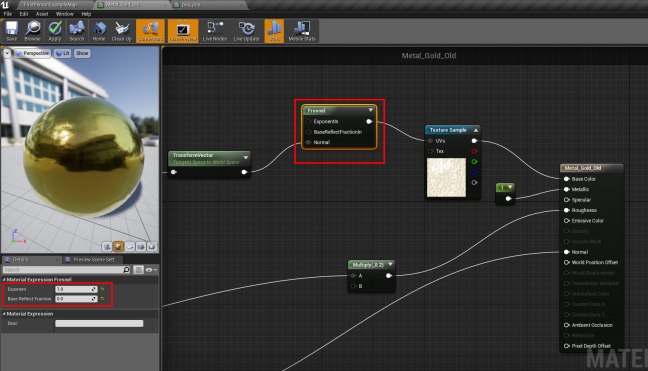
One of the optical properties of many metallic surfaces is changing it’s color slightly as the surface viewing angle changes.
This effect can be simply created using a Fresnel node and a color-ramp texture.

Untitled-4

  1. Create a metallic material (metallic value of 1.0).
  2. Use an image editing software to create a linear color ramp texture (gradient) of the color change per viewing angle from left to right. like this example for a golden metal, and import it to your project.
    Ramp_Gold
  3. Add the ramp texture to the material Blueprint, and connect it to the material Base Color Input.
  4. Create a Fresnel node and set its Exponent value to 1.0 and its Base Reflect Fraction to a value of 0.0 so it will provide a linear angle blend value.
  5. Connect the Fresnel node’s output to the UVs input of the ramp texture node.
    * the reason the Fresnel node can be providing both the X and Y texture coordinates is that the texture’s Y dimension provides the same color for all values anyway.

Note:
When the Metallic property of an Unreal Engine material is set to 1.0, the material automatically simulates the metal’s color fading to white at parallel surface viewing angle (the sides) like it should.
So using a Color Ramp Texture like in this example creates an amplified effect.
* Simply put: You don’t have to have the Color Ramp fade to white on the right side of the texture..

Untitled-4

Untitled-3

Simple Toon shader setup in Maya & Arnold

Software:
Maya 2018

Use a Surface Luminance node as a V coordinate input value for a Ramp (V Ramp) node containing the toon colors.

* Note that the Clamp node is important so results will be ass expected, it clamps the Surface Luminance values to 0.99 so the V coordinate will nor cycle back to the beginning of the Ramp.

Untitled-1.jpg

Related:
Toon Shading in V-Ray for Maya