UE4 – Triplanar projection mapping setup

Software:
Unreal Engine 4.25

Triplanar Projection Mapping can be an effective texture mapping solution for cases where the model doesn’t have naturally flowing continuous UV coordinates, or there is a need to have the texture projected independently of UV channels, with minimally visible stretching and other mapping artifacts.
Classic use cases for Triplanar Projection Mapping are terrains and organic materials. provided that the image being used is a seamless texture, no seams will be visible because this projection type isn’t affected by UV coordinates.
Triplanar Projection Mapping can also be used in world space to create a continuous texture between separate meshes, allowing the meshes to be indestructibly transformed and edited.

How does Triplanar Projection Mapping work?
Triplanar Projection Mapping is a linear blend between 3 orthogonal 2D planar texture projections, typically each aligned to a natural world or object axis.
The more the surface faces an axis, the higher the weight of this axis projection in the final blend.

UE4 local (object) space Triplanar Projection Mapping material setup:
* It’s usually more efficient to create this setup as a Material Function

  1. Local shading coordinates are multiplied by by a “density” parameter to allow convenient scaling of the projected.
  2. The scaled coordinates vector is separated to its components who are combined to 3 pairs of planar coordinates XY, XZ and YZ, and fed as the sample coordinates to the 3 Texture Sample nodes.
  3. The Vertex Normal input vector is transformed to local space, converted to absolute value (absolute orientation in the positive axes octant) and separated to its X, Y and Z components so they can serve as blend weights in the mix.
  4. Each of the 3 planar axis projections is multiplied by the blend factors, and the resulting values are added to the raw mix.
  5. A value of 1.0 is divided by the Normal vector component values to obtain the factor needed to normalize the blend result to a value of 1.0.
  6. The raw blend value is multiplied by the normalizing factor so the blend resulting color will be normalized.
    * The blend weights should add to a value of 1.0, but a unit vector’s values add up to more than 1 in diagonal directions. for this reason, without this final step, the color of the texture in point on the surface that are diagonal to the projection axes will appear brighter than in points on the surface that face a projection axis.

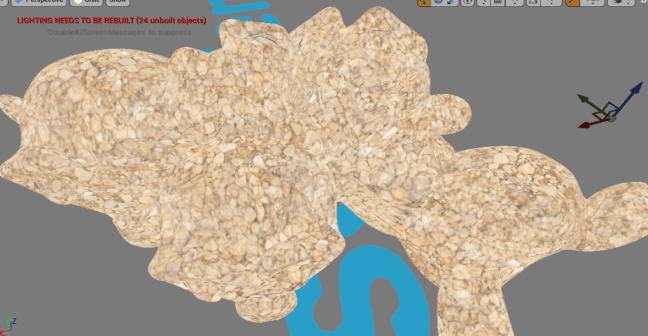
An example of Triplanar Projection Mapping in world space:

A bunch of Blender monkeys (Suzanne) continuously textured using world space Triplanar Projection Mapping:
Related posts:
UE4 – Material Functions
UE4 – Material Instances
UE4 – Bump mapping
UE4 – Procedural bump mapping

Blender – Adding a texture to an Area Light

Software:
Blender 2.82

Adding a texture to an area light can make it produce softer and more detailed highlights and an overall more organic lighting effect.

Note:
Since an Area light in Blender isn’t rendered as an actual mesh object with UV coordinates, it’s texture coordinates are parametric (see below).

Adding a texture to an Area Light:

  1. In the Area Light properties click the Use Nodes button (see image A) to initiate its node graph and allow texturing it.
  2. In the Shader Editor view (with the light selected), drop your texture to the light’s node graph and connect it to the light’s Emission node’s Color input. (see image B)
  3. Create a new Input > Geometry node, and connect it’s Parametric output to the Image Texture’s Vector input. (see image B)

A. Without a texture the Area light produces a hard flat highlight:
a

B. With the vignette texture, the Area light now has a more subtle organic effect:
* The Emission node’s Strength was increased in this case to compensate for the lower light output with the texture.
b
Related posts:

  1. Cycles Area Light pleasent surprise
  2. Cycles Area Light shader visibility

3ds max – Using a GradientRamp procedural texture in Mapped mode

Software:
3ds max 2020

Using the GradientRamp procedural texture map in Mapped mode can very useful for creating procedural material effects.
The Idea is that the lightness value from a different map will determine what part of the GradientRamp is sampled.

In this example the GradientRamp uses values produced by a procedural Falloff map set to Perpendicular-Parallel mode, as its coordinates source, to create richly colored metal that changes its Hue depending on View/Incident angle:

Annotation 2020-05-02 184426

In this example the GradientRamp uses values produced by a procedural Noise map as its coordinates source to create an irregular color effect:

Annotation 2020-05-02 184849

Note:
The examples here were rendered using V-Ray Next for 3ds max, but this technique could also be used with other rendering engines.


Related:

  1. 3ds max Island/seashore tip

Maya – Basic UV unwrapping

Software:
Maya 2018

Steps for basic UV unwrapping:

  1. Select all polygons.
  2. Apply planar UV projection just to get rid of all the current UV seams.
  3. Select the edges that that are intended to be UV seams.
  4. In the UV Editor menu choose Cut/Sew > Cut.
  5. Select all polygons.
  6. In the UV Editor menu choose Modify > Unfold.
  7. In the UV Editor menu choose Modify > Layout.
  8. Scale and rotate the UV layout to fit the UV space.

Related:
Multiple UV layouts

Maya – Using Multiple UV Sets

Software:
Maya 2018

Annotation 2019-12-26 232222

Note:
This post isn’t about “tiled UVs” (“UDIM”), it’s about multiple UV sets (layouts).

Explanation:
Polygon mesh models can have multiple UV sets. this becomes useful when the UV layout that is optimal for a certain texture isn’t efficient for different texture (in the same material).
For example, we might have a model of furniture, or clothing, in which the UV layout that is best for the fabric weave pattern, isn’t the best for dirt and wear & tear, or stickers.
In such cases we can define different UV sets for the model, each suitable for a different texture.

In this example, having a separate UV Set for the logo texture allows placing it without affecting the checker texture that is displayed an all the surfaces:uvsets

To create multiple UV sets:

  1. In the UV editor view, from the UV Sets menu, select UV Set Editor to open the UV Set Editor:
    Annotation 2019-12-26 234412.jpg
  2. In the UV Set Editor, press the New button to create a new UV Set and double click it in the list to rename it:
    Annotation 2019-12-26 234522
  3. Close the UV Sets Editor.
    The UV Editor view  now displays the new UV Set that is empty, and UV creation and editing operations will now affect the new UV Set.
  4. To switch to edit a different UV Set, select it from the list at the bottom of the UV Sets menu:
    Annotation 2019-12-26 235925


To link a texture to a specific UV Set:

  1. Make sure the texture is connected to the material set for the model.
  2. Select the model.
  3. Open Windows > Relationship Editors > UV Linking > Texture-Centric:
    Annotation 2019-12-27 000308.jpg
  4. Select the wanted texture from the material texture list on the left and select the wanted UV Set from the models UV Sets list on the right:
    Annotation 2019-12-27 000336


Related:
Basic UV Unwrapping

More posts about Maya


Advanced Procedural Wood for Blender & Cycles

Software:
Blender 2.8 | Cycles

CG-Lion Wood Presets Pack 1.0 is an advanced 3D procedural wood shader I developed for Blender and the Cycles render engine that produces consistent wood pattern on all sides of the model without requiring UV coordinates.
The shader has many tweak-able parameters for easy customization of the wood pattern, and also has built-in varnish coat and paint layers.
CG-Lion Wood Presets Pack 1.0 ships with a ready-to-use material preset library.

CG-Lion Wood Presets Pack 1.0 is available on Blender Market:
https://blendermarket.com/products/cg-lion-wood-presets-pack-1

CGL_Wood_Presets_Pack_1.0_Node_B.jpg

This slideshow requires JavaScript.

CGL_Wood_Presets_Pack_1.0_Previews_Natural

CGL_Wood_Presets_Pack_1.0_Previews_Matte_Varnished

CGL_Wood_Presets_Pack_1.0_Previews_Varnished

Related:
Realistic Spotlights for Blender & Cycles
Optimized Architectural Glazing Shader for Cycles
Customizable Photo-realistic Car-paint shader for Cycles


Basic Cloth Material in Arnold for Maya

Software:
Maya 2018 | Arnold 5

An example of a basic traditional (not scanned) cloth material setup in Arnold 5 for Maya using an aiStandardSurface shader.

Untitled-1.jpg

The shading network uses a classic angle dependent color blend to simulate the color of the cloth being washed out at grazing angle of view.

Explanation of the node graph:

Untitled-2.jpg

  1. A black and white fabric weave texture that will serve as input for multiple shading channels.
    * This is actually not the best example of such a pattern, and could be replaced with a much better texture.
    cotton grey bump
  2. A remapValue node is used to set contrast to the fabric pattern (reduce contrast in this case) prior to it being multiplied with the fabric colors.
    * Note that only one of the textures RGB channels is connected to the remapValue node since it’s a float (mono) processor and not RGB.
    Untitled-3
    * Note that depending on the fabric texture, you may have to design different curves to achieve the right effect.
  3. Two colors are defined with colorConstant nodes:
    A deep color as the main fabric color, and a washed out color for grazing angle view (“side color”).
  4. An aiFacingRatio node is used as an input for incident angle info.
    * Note that in this case I checked the node’s invert option to make it behave more like other systems I’m used to (if you don’t use invert, the angle blend curve in 5 will be different..)
  5.  A remapValue node used to set the angle blend curve or in other words, how much does the color appears washed out per change of view angle of the cloth surface.
    * The longer it take the curve to become steep from left to right, the more the main color will be dominant before the washed out color will appear.
    Untitled-4
  6. A colorCorrect node is used in this example just as a way to convert the remapped float value back to RGB for being multiplied with the cloth colors.
    * We could also connect it directly to the individual float components of the RGB colors but this way the node graph is cleaner.
  7. A multiplyDivide node is used to multiply the processed fabric texture with the 2 fabric colors “baking” the pattern into the color.
  8. A blendColors node is used to blend the 2 processed fabric colors together according to the processed facingRatio angle input.
    The result is the final cloth color that is connected to the aiStandardSurface shader.
  9. An aiBump2d node is used to convert the fabric pattern to normal data that will be connected to the aiStandardSurface shader to produce bumps.
  10. An aiStandartSurface shader serving as the main shading node for this material.
    * Note that under Geometry the Thin Walled option is checked so that the Subsurface layer of the shader will act as a Paper Shader rather than SSS.
    * The main cloth color is connected to the SubSurface Color input.
    Untitled-5


More Arnold shading posts

Getting Maya 3D Paint to work

Software:
Maya 2018

Steps needed for Maya 3D Paint to work:

  1. Set a project folder and save your scene.
    * If your painting into an existing texture you can skip this step.
  2. Make sure your model has UV coordinates.
  3. Make sure your model has a basic Lambert material.
    * If you’re using a different material/shader on your model,
    Temporarily switch to Lambert just for the texture painting operation,
    And connect the original shader with the painted texture map to the surface shader input of the shading group after you’re done painting.
  4. In the Rendering tab toolbar, Double-Click the 3D Paint tool button to activate 3D Paint and also open its tool settings window.
  5. Make sure the object is selected.
  6. In the 3D Paint Settings window, go to the File Textures part,
    Choose a material attribute to paint to.
    * this would usually be Color because we are using Lambert temporarily anyway.
  7. Click Assign/Edit Textures to open the Assign/Edit Textures dialog,
    Choose a resolution and a file format for the new texture,
    And than click Assign/Edit Textures button at the bottom of the Assign/Edit Textures dialog to create the new texture and close the dialog.
    * If you already connected an existing texture file to the Lambert shader’s Color input you can skip this step.
  8. Check Update on stroke and Save texture on stroke.
  9. Set the viewport to Textured display mode.
  10. Set paint brush settings.
  11. Click the 3D Paint tool button to activate it and paint on the model surface.

Untitled-1

UE4 – Bump Map

Software:
Unreal Engine 4.21

To use a ‘Bump Texture’ in UE4, or in more geeky terms, derive Normal data from a supplied height map, use the NormalFromHeightMap Node.

Notes:

  1. The height map textured is supplied via Texture Object node and not Texture Sample, and is connected to the NormalFromHeightMap‘s Height Map input.
  2. A numeric vale is connected to the NormalFromHeightMap‘s Normal Map Intensity input to control the intensity of the resulting Normals/Bump.
  3. UV coordinates for the bump map should be connected to the Coordinates input of the NormalFromHeightMap node.

bump

Related:
UE4 – Procedural Bump Normals
UE4 – fix an inverted normal map
UE4 – Triplanar mapping

Randomize textures in V-Ray for Maya

Software:
Maya 2018 | V-Ray 3.6

Connect the different texture options as inputs to a VRayMultiSubTexNode and connect it to the wanted material input.
In the VRayMultiSubTexNode attributes, set Get ID From to Random by Render ID.
* Press add new item in the VRayMultiSubTexNode attributes to add one or more inputs to the list.

Untitled-1