Adobe Bridge – Full screen preview tips

Software:
Adobe Bridge 2020

  1. To get into full screen preview mode:
    Select an image and press Spacebar
  2. Use the arrow keys to navigate images in the folder
  3. Scroll the mouse wheel to zoom in-out

Note:
In full screen mode, you may see the images display soft / low resolution,
Even if the actual image files have enough resolution to fit the display.
This happens because Bridge’s cached previews were not generated at display resolution.
To fix this issue:

  1. In Edit > Preferences > Advanced:
    Check the Generate Monitor-Size Previews option
    Br
  2. In Tools > Cache >Manage Cache..:
    Select Clean Up Cache, Purge all local cache files,
    And then click Next.
    * You may have to restart the program for this to take effect
    Annotation 2020-08-17 193558

Using Color Lookup Tables (CLUTs)

What is this all about?

Color Lookup Tables – CLUTs (also “Color LUTs“) are a method of storing and reusing complex linear color transformations*.
CLUTs have the advantages of being supported by many video and image processing software packages, and also the ability to be calculated in real-time on the GPU, costing very little computing resources.
* More simple, daily use terms can be: “color styles”, or “color corrections”

CLUTs are used in the movie production industry to perform color conversions of images acquired from different sources for monitoring and editing purposes, and also for testing, applying and sharing different creative color styles across different departments, and stages of the production.
Examples of common CLUT file formats are *.3DL and *.CUBE

Why is this called a “3D” or “Cube” Lookup Table?

The reason CLUTs are referred to as “3D” color lookup tables or “Cube LUT” is that they store the effect of color operations as linear transformations of a 3D cubic space.
To understand this we have to imagine RGB color encoding as a 3D space with the R, G and B values of each color being coordinates in this cubic color space.
This means that the color correction operations we perform to create a color style, like adding contrast, saturation, warming the hues etc. are all defined as a function that for every color coordinate in the RGB color cube space defines the new coordinate where the corrected or stylized color is found.
The term Lookup table means that the new color values don’t have to be calculated every time because they have been pre-calculated and stored in a table of values.
3D CLUTs are often processed and stored as 3D Cubic textures like this example generated with Blackmagic Fusion of a 32 x 32 x 32 value CLUT.
Imagine the little 32 x 32 square patches all stacked one upon the other, that would create a 32 x 32 x 32 RGB color cube, with which color transformations can be stored by simply applying them on this texture:Cube0000

Working with CLUTs:

In this post we’ll go trough the process of creating and using a CLUT in some popular creative software packages.
* Note that there are many other software packages that support creation and usage of CLUTs, the process should be similar.

Steps shown in the following software:
Adobe Photoshop 2020
Adobe After Effects 2020
Adobe Premiere 2020
Blackmagic Design Fusion 9

In this example our source image with which the CLUT will be designed is an interior scene modeled with Blender 2.82 and rendered with Cycles Render Engine with “Filmic” tone-mapping applied, saved as a PNG file.
* I usually save Linear unclamped 32bit float EXR files as the raw output from render engines, because this is the format that provides the most freedom to manipulate and process rendered images and animation, but from my experience CLUTS don’t work well on linear unclamped color, for that reason I usually apply them at a later stage of the image development (usually after applying tone-mapping to the image).
This is why I saved the file directly as a tone-mapped PNG for this example.

A.Test_Image

Creating a CLUT in Adobe Photoshop:

For this example, a greenish-contrasty-desaturated color style is created in Photoshop by applying color adjustment layers to the image.
In this case Color Balance, Vibrance, and Curves.
* You can use different numbers and combinations of color adjustments

B.Photoshop_Grade

The new Color Style is now exported to CLUT files:

C.Photoshop_Export_CLUTS

In the Export Color Lookup Tables dialog allows naming the CLUT, adding a description, setting a quality for the color transform it will define, and selecting the wanted CLUT file formats that will be written.
After clicking OK the CLUT files will be saved in a chosen location.C1.Photoshop_Export_CLUTS

Note:
Saving the CLUT in the Presets\3DLUTs folder (found in the Adobe Photoshop installation folder) will allow reusing the CLUT as a preset look available by drop-down selection without having to locate the file each time.

Applying a CLUT in Adobe Photoshop:

With the image later selected, add a Color Lookup adjustment layer:

D.Photoshop_Lut_Adjustment

In the Color Lookup adjustment properties, open the 3DLUT File drop-down, choose Load 3D LUT, and locate the CLUT file you saved:E.Photoshop_Lut_Load

The original image now has the same color style we created earlier, but this time it’s applied by only a single Color Lookup adjustment layer:

F.Photoshop_Lut_Correction

An example of the same CLUT applied to a different image:

F1.Photoshop_Lut_Correction_B

Applying a CLUT in Adobe After Effects:

Add a Util > Apply Color LUT effect to a layer,
In the Effect Controls window, click Choose LUT and locate the wanted CLUT file:

G.AE_Apply_CLUT

Applying a CLUT in Adobe Premiere:

  1. Select the image/video clip in the timeline.
  2. Switch to the Color UI tab to get access to the Lumetri Color controls on the right.
  3. In the Creative section of the Lumetri Color controls, open the Look dropdown, choose Browse and locate the wanted CLUT file.

I.Premiere_Apply_CLUT

I.Premiere_Apply_CLUT_B

Applying a CLUT in Blackmagic Design Fusion:

Add a LUT >File LUT node to the image source.
In the File LUT properties, click the browse button and locate the wanted CLUT file:

H.Fusion_Apply_CLUT

Creating a CLUT in Blackmagic Design Fusion:

* See the numbered nodes in the flow graph below

  1. Source image/video on which the CLUT is designed.
  2. A LUT Cube Creator node, generating default neutral 3D CLUT data in the form of a Color Cube map.
  3. The nodes creating the actual color style (in this case a Color Corrector and Color Curve nodes) are operating on the LUT Cube Creator node’s output.
  4. A LUT Cube Apply node is applying the stylized CLUT data to the image/video for previewing purpose (displayed on the right viewer)
  5. A LUT Cube Analyzer node generates CLUT data from the styled LUT Cube Creator data, and allows saving it to disk as a CLUT file.
    * Choose a location and click Write File to save the CLUT file.

K.Fusion_Create_LUT

Setting Windows 10 Ransomware protection not to block Adobe Photoshop

Software:
Adobe Photoshop 2020 | Microsoft Windows 10

If you encountered this error message when launching Adobe Photoshop:
“There was a problem with Generator. If the problem persits….”
Annotation 2020-04-18 221206

Chances are it has to do with Windows 10 Ransomware protection blocking it and one of it’s components, and if you continue to working with Photoshop with this problem you’ll find export modules (and maybe other features) not working.

In-order to fix the problem, we have to set Windows Ransomware protection not to block these components:

  1. In the Windows Virus & threat protection settings,
    Click Manage ransomware protection:
    Annotation 2020-04-18 221251
  2. In the Windows Ransomware protection settings,
    Click Allow an app through Controlled folder access:
    Annotation 2020-04-18 221352
  3. In the Allow an app through Controlled folder access settings,
    Click Add an allowed app:
    Annotation 2020-04-18 221420
  4. To avoid having to locate the specific executable files choose Recently blocked apps:
    Annotation 2020-04-18 221444
  5. In the Recently blocked apps select both AdobeGCClient.exe and Photoshop.exe:
    * Click the plus button to add them:
    Annotation 2020-04-18 221639


General note:
You may need to to the same with many other apps.
Every time you get a Windows notification about a process being blocked,
Visit the ransomware protection setting, check what was the last app being blocked and see if it needs to be allowed to operate

That’s it. hope you’ll find this helpful! 🙂


After Effects – Camera Lens Blur effect

Software:
After Effects CC 2019

Untitled-2

Adobe After Effects has a very effective Camera Lens Blur effect that is capable of efficiently faking DOF (Depth Of Field) and Bokeh visual effects for 3D rendered images and animations, and also animate a fake “Focus-Pull”.

The effect will work best on 32 bit float EXR files, and requires a Z depth render element (pass/AOV) to be rendered with the main RGB image, and supplied as the Blur Map layer.

Tip:
If necessary, color correct the Z depth image so that the Black to White range will reflect the wanted focus range, and that the closest depth will be Black, blending into White at the furthest depth.

Example of a Z Depth image:Buddha_Z0.jpg

Untitled-3

Radius:
Controls the blurriness

Shape:
Choose the lens iris shape (number of blades) to design the Bokeh effect

Blur Map:
Defines a black & White Depth Layer (Z Depth) where black is the closes point to the camera and white is the furthest.

Blur Focal Distance:
Values of 0.0 to 1.0 will have the black through grey to white areas of the Blur Map remain at focus (sharp)

Highlight > Gain:
Intensify the highlights to create a more dominant Bokeh effect


Untitled-2.jpg


Related:
DOF in Arnold for Maya

Master Text Styles in Premiere Pro CC

Software:
Premiere Pro CC 2018

Create a Master Text Style and apply it to multiple text objects:

  1. Open the Essential Graphics panel:
    Window > Essential Graphics
    And in the panel, click the Edit tab.
  2. Select the text from which you want to create the Master Style in the Program Monitor Window.
  3. In the Essential Graphics panel, in the Edit tab, Under Master Styles,
    Open the drop down menu, choose Create New Master Text Style, and give it a name in the dialog box.
    * The new text master style now appears in the project window
  4. Drag the Master Text Style from the project window on text clips in the timeline to apply the style to them.

Untitled-1


Media Encoder – 8K video & 8K 360 VR video for YouTube

Software:
Adobe Media Encoder CC 2018

Recently YouTube added support for uploading HEVC H.265 video encoding.
That’s great news for anyone wanting to upload 8K video from Adobe Premiere Pro CC, or After Effects CC, because there’s no need to use inconvenient third party workarounds and plugins like WebM, DNxHD etc.
Abobe Media Encoder doesn’t allow encoding H.264 at higher than 4K resolutions*, but has native support for HEVC H.265 that does allow 8K encoding.
* There’s a commercial plugin that encodes H.264 at 8K.

Another convenient & time saving feature in the Adobe Media Encoder H.265 output module is the option to add panoramic VR video meta-data to the file eliminating the need to use meta-data “injection” utilities,
So uploading 8K stereo 360 VR video to YouTube became completely hassle-free 🙂

Untitled-1


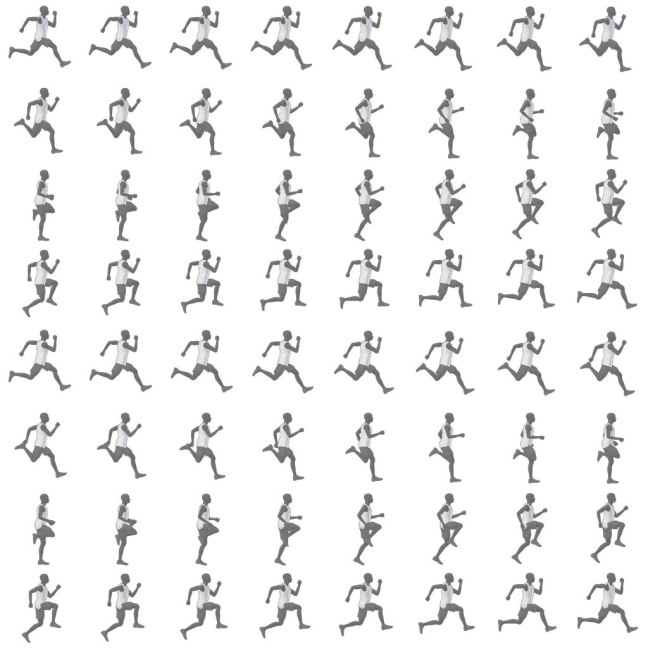
Creating a Sprite Sheet in Animate

Software:
Animate CC 18

To generate a Sprite Sheet (Texture Atlas) in Animate:

  1. Create a new project.
    * the type of the project doesn’t matter.
  2. Drag all your animation frames from into the Library window in Animate.
  3. Select all the frames in the Library window.
  4. RMB Click the selected frames and choose Generate Sprite Sheet.
  5. In the Generate Sprite Sheet window, set the Sprite Sheet settings, output path and press Export.

Untitled-1.jpg

Untitled-2

Untitled-3

Runner_Atlas

Premiere Audio Track Mixer vs Audio Clip Mixer

Software:
Premiere Pro CC 2018

It turns out that even with many years experience in video editing with Adobe Premiere Pro, I wasn’t aware of the Audio Clip Mixer panel.
I did a lot of work with the Audio Track Mixer, but for individual clips I would set the volume and pan in the Effect Controls panel.

It’s pretty simple to explain the difference between the two panels,
The Audio Track Mixer lets you design the audio mix of a whole audio track, while the Audio Clip Mixer lets you set the mix between individual audio clips in an audio track.

It just so happens, that in Premiere Pro CC 2018, the Audio Clip Mixer is the one that’s open by default, so thinking by mistake it was the Audio Track Mixer, I started using it to set the mix, only to be surprised that the volume I set is changing as I scrub the timeline..
First I thought that maybe automation is on from some reason, and key-frames are being created, but the the key-frame display for the Audio track didn’t show any changes.
I was quite baffled for a couple of minutes, until I realized that the mixing panel I’m working with is actually titled Audio Clip Mixer, and opened the Audio Track Mixer to work as I’m used to.
* One of the reasons it’s confusing is that the Audio Clip Mixer panel displays volume controls per audio track (which makes sense, it just affects the individual clip within the track at the point in the editing timeline)

The Audio Track Mixer:
Untitled-1

The Audio Clip Mixer:
Untitled-2