Basic Cloth Material in Arnold for Maya

Software:
Maya 2018 | Arnold 5

An example of a basic traditional (not scanned) cloth material setup in Arnold 5 for Maya using an aiStandardSurface shader.

Untitled-1.jpg

The shading network uses a classic angle dependent color blend to simulate the color of the cloth being washed out at grazing angle of view.

Explanation of the node graph:

Untitled-2.jpg

  1. A black and white fabric weave texture that will serve as input for multiple shading channels.
    * This is actually not the best example of such a pattern, and could be replaced with a much better texture.
    cotton grey bump
  2. A remapValue node is used to set contrast to the fabric pattern (reduce contrast in this case) prior to it being multiplied with the fabric colors.
    * Note that only one of the textures RGB channels is connected to the remapValue node since it’s a float (mono) processor and not RGB.
    Untitled-3
    * Note that depending on the fabric texture, you may have to design different curves to achieve the right effect.
  3. Two colors are defined with colorConstant nodes:
    A deep color as the main fabric color, and a washed out color for grazing angle view (“side color”).
  4. An aiFacingRatio node is used as an input for incident angle info.
    * Note that in this case I checked the node’s invert option to make it behave more like other systems I’m used to (if you don’t use invert, the angle blend curve in 5 will be different..)
  5.  A remapValue node used to set the angle blend curve or in other words, how much does the color appears washed out per change of view angle of the cloth surface.
    * The longer it take the curve to become steep from left to right, the more the main color will be dominant before the washed out color will appear.
    Untitled-4
  6. A colorCorrect node is used in this example just as a way to convert the remapped float value back to RGB for being multiplied with the cloth colors.
    * We could also connect it directly to the individual float components of the RGB colors but this way the node graph is cleaner.
  7. A multiplyDivide node is used to multiply the processed fabric texture with the 2 fabric colors “baking” the pattern into the color.
  8. A blendColors node is used to blend the 2 processed fabric colors together according to the processed facingRatio angle input.
    The result is the final cloth color that is connected to the aiStandardSurface shader.
  9. An aiBump2d node is used to convert the fabric pattern to normal data that will be connected to the aiStandardSurface shader to produce bumps.
  10. An aiStandartSurface shader serving as the main shading node for this material.
    * Note that under Geometry the Thin Walled option is checked so that the Subsurface layer of the shader will act as a Paper Shader rather than SSS.
    * The main cloth color is connected to the SubSurface Color input.
    Untitled-5


More Arnold shading posts

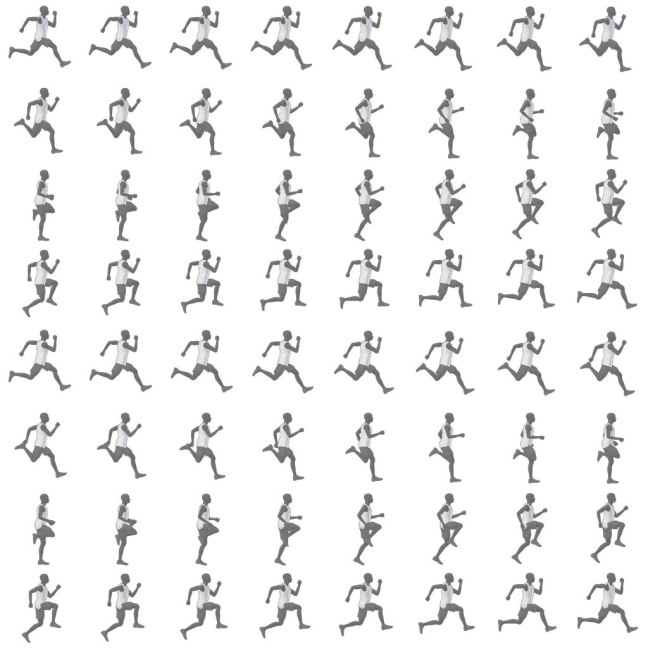
Sprite Sheet – Storing animation frames in one texture

Runner_Atlas

An efficient way to store 2D animation for games is to layout all the frames withing one texture called a ‘Sprite Sheet’ or ‘Texture Atlas’.
This saves resources by avoiding multiple texture loading operations and only animating the UVs of the shader to display the needed image at each frame.
Sprite Sheets are also used to pack various states of game graphics and textures for multiple objects in one file.

Creating Sprite-Sheets:
Sprite Sheets can be created manually using any image editing software,
For an automated process and more control, a specialized software like Texture Packer can be used.
And it can also be done automatically in Adobe Animate (Flash).
* There are many more solutions / scripts that will do that you can find on the web…

Creating a Sprite Sheet in Animate

Software:
Animate CC 18

To generate a Sprite Sheet (Texture Atlas) in Animate:

  1. Create a new project.
    * the type of the project doesn’t matter.
  2. Drag all your animation frames from into the Library window in Animate.
  3. Select all the frames in the Library window.
  4. RMB Click the selected frames and choose Generate Sprite Sheet.
  5. In the Generate Sprite Sheet window, set the Sprite Sheet settings, output path and press Export.

Untitled-1.jpg

Untitled-2

Untitled-3

Runner_Atlas

3ds max – Unwrap UVW snapping to a defined grid

Software:
3ds max 2018

There are cases where we need to have the UV borders and edges placed precisely on a certain grid. an example of this is when preparing a UV layout intended for baked lightmaps in a game engine, that should preferably be aligned to a 64 by 64 or 128 by 128 grid.

To set the Unwrap UVW editor window grid to 64 by 64:

  1. In the Unwrap Options window:
    Set the Checker display to 64/20 which is 3.2.
    Set the Grid Size to 1/64 which is 0.015625 (the numeric field displays the value rounded to 0.016)
  2. Turn on the grid display in View > Show Grid.
  3. In the Unwrap Snap Settings, make sure Grid Snap is checked.
    * Hold and drag the snap button to open the Snap Settings.
  4. Activate Snap.

Note:
It works only in Vertex selection mode.

UV_Snap.jpg

Texture Color-Space in Maya

Software:
Maya 2018

Along with the Filtering Type, and the File Path attributes,
The File Attributes for texture nodes in Maya have the option to set a Color-Space with which to interpret the color values stored in the file’s pixels.
For example, JPG and PNG files will be interpreted as sRGB Color-Space by default, which means the color values will be ‘linearized’ (their Gamma Correction will be removed), and EXR or HDR files will be automatically interpreted as ‘Raw’ (linear) Color Space.

When an sRGB file like a PNG is intended to serve as linear data, and not as image display. it’s sometimes needed to set its Colors Space attribute to Raw. this is usually the case with Bump maps and Normal maps.

Equivalent setting are also found in other  3D software, see Blender Texture Color Space.

Untitled-2.jpg

Creating text height maps in photoshop

Software:
Photoshop CC 2017

When you need to create a 3D title that looks carved in stone by using a height map or normal map of the text design,
And you need to have the titles remain as live text in Photoshop so that you can easily make changes to the text if needed,
A simple way to make turn the text into a height map that would look carved or beveled inwards is to apply an inner glow effect and choose the “Precise”option in the “Technique” parameter of the effect.
Beveled_Text_Height_map