When sampling textures using an HLSL custom node, The UE4 TextureObject input name, will automatically have a sampler object generated named:
<your TextureObject name>sampler
For example, if you named your TextureObject input “tex_in”, the available sampler will be named “tex_insampler”. So the code for sampling the texture will be:
Texture2DSample(tex_in, tex_inSampler, coords);
The following is an example of a simple u-blur custom node code, with 4 node inputs: 1. tex_in – TextureObject 2. coords – float2 3. size – float 4. sample – float
int blur_samples = int(samples * 0.5f);
float3 col = 0.0f;
float2 sample_coords = 0.0f;
for (int i = -blur_samples; i < blur_samples; i ++)
{
sample_coords.x = i * (size / blur_samples * 2);
col += Texture2DSample(tex_in, tex_inSampler, coords + sample_coords ) / (blur_samples * 2);
}
return col;
Yet another case where I develop my own costly solution only to find out afterwards that there’s actually a much more efficient built-in solution.. 😀
In this case the subject is deriving a bump normal from a procedural or non-uv projected height map/texture (like noise, or tri-planar mapping for example).
The built-in way: Using the pre-made material functions, PreparePerturbNormalHQ and PerturbNormalHQ, the first of which uses the low level Direct3D functions DDX and DDY to derive the two extra surface adjacent values needed to derive a bump normal, and the last uses the 3 values to generate a world-space bump normal:
240 instructions
Noise coordinates are obtained by multiplying the surface shading point local position by a value to set the pattern density.
The Noise output value is multiplied by a factor to set the resulting bump intensity.
The PreparePerturbNormalHQ function is used to derive the 2 extra values needed to derive a bump normal.
The PerturbNormalHQ function is used to derive the World-Space bump normal.
Note: Using this method, the material’s normal input must be set to world-space by unchecking Tangent Space Normal in the material properties.
The method I’m using: This method is significantly more expensive in the number of shader instructions, but in my opinion, generates a better quality bump. Sampling 3 Noise nodes at 3 adjacent locations in tangent-space to derive the 3 input values necessary for the NormalFromFunction material function:
412 instructions
Noise coordinates are obtained by multiplying the surface shading point local position by a value to set the pattern density.
Crossing the vertex normal with the vertex tangent vectors to derive the bitangent (sometimes called “binormal”).
Multiplying the vertex-tangent and bitangent vectors by a bump-offset* factor to create the increment steps to the additional sampled Noise values. * This factor should be parameter for easy tuning, since it determines the distance between the height samples in tangent space.
The increment vectors are added to the local-position to get the final height samples positions.
The NormalFromFunction material function is used to derive a tangent-space normal from the 3 supplied height samples.
Note: From my experience, even though the UV1, UV2 and UV3 inputs of the NormalFromFunction are annotated as V3, the function will only work is the inputs are a scalar value and not a vector/color.
The TeoSidedSign node let’s the shader “know” if a rendered polygon is facing the camera or not by outputting a value of 1 for facing polys and -1 for back-facing polys.
This is useful for creating materials that have different properties when seen front-facing or back-facing.
Example 1:
Blending two different colors based on face direction:
Check the Two Sided material attribute.
* Needed so that the engine will render the polygons beck sides.
In the material blueprint, create a blend of to colors using a Lerp (LinearInterpolate) node and connect it to the material’s Base Color input.
Add a TwoSidedSign node to get polygon facing input (1,-1).
Connect the TwoSidedSign node’s output to a Clamp node to clamp the values to (1,0).
Connect the Clamp node’s output to the Lerp node’s Alpha input so that the polygon’s facing direction will control the Lerp blend.
Note:
You can use this method to blend any other material attribute based on polygon facing direction.
Example 2:
Create an “inwards facing” flipped normal material:
Set the material’s Blend Mode to Masked.
* Needed for being able to make areas parts of the mesh invisible.
Check the Two Sided material attribute.
* Needed so that the engine will render the polygons beck sides.
Add a TwoSidedSign node to get polygon facing input (1,-1).
Connect the TwoSidedSign node’s output to a Clamp node to clamp the values to (1,0).
Connect the Clamp node’s output to a 1-X node to invert the facing input.
Connect the 1-X node’s output to the material’s Opacity Mask input so that polygons facing the camera will be invisible.
The example explained in this article is creating a blend between a mud material, and a mud-leaves material using a mask (Alpha) texture.
>> The scanned PBR materials in demonstrated in this post are from Texture Haven (texturehaven.com)
How does it work? There is actually no blending of Unreal materials, but rather a regular Unreal material in which each of the parameters is defined as a linear blend between 2 different source values for that parameter.
We could create such a material blueprint that uses a Lerp (Linear Interpolate) node’s to provide each of the material parameters with a blend of 2 input textures/colors or parameters, connecting the alpha texture to all the Lerp nodes’s Alpha input, and effectively achieve blending of 2 different materials, but it would be a complex blueprint in which it’s very inconvenient to design each of the individual materials participating in the blend:
This complexity can be greatly simplified by collecting each of the participating materials parameters into a Material Attributes data structure.
The Material Attributes data structure contains all the data needed to compile a material, and allows input, output, and processing of this data as a single blueprint data stream (connection).
For example, when the material parameters are grouped as a Material Attributes data structure, they can be blended by connecting them into a single BlendMaterialAttributes node, instead of “Lerping” (blending) between 2 inputs to create each individual material parameter, which produces an unworkable complex material blueprint like the previous example.
> To collect material parameters into a Material Attributes data structure, connect them into a MakeMaterialAttributes node:
> To create a blend between 2 Material Attributes data streams, use the BlendMaterialAttributes node:
* The Alpha parameter determines the weights of the blend (a black and white texture can be connected to it as the blend mask)
> In order for the material output to receive a grouped Material attributes input instead of individual inputs for each parameter, select the material output, and in the Details panel, check the Use Material Attributes option:
Using the Material Attributes data structure, the blended material’s Blueprint in now much simpler and cleaner, while producing the exact same result as before:
But designing 2 different materials within one material Blueprint is still far from being ideal..
What if we want to use just one of these materials on some surfaces?
What if the individual materials are not as simple as the materials shown here, it would be mush more efficient to be able to have one Blueprint for each of the materials allowing to focus on its development and preview it.
We can achieve this desired workflow by developing each of the materials as a Material Function.
Each of the participating materials is created as a Material Function with a Material Attributes output.
> One of the huge advantages of UE4’s material editing is that it allows us to preview a full material while developing it as a Material Function.
* This may sound trivial, but it isn’t. the Material Function isn’t compiled by itself as a material, it just produces data needed to define a material. in many other media production systems, this would have meant that you can develop data within the function but only preview it in the main material where the function is used.
The Material Function defining the mud-leaves material:
The Blend material using the Material Function nodes:
Note:
When blending a non-metallic material with a metal material, the alpha values (mask colors) should be only 0 or 1 (black or white), otherwise blend areas that have a mid-range metallic value will make no sense visually.
> A RemapValueRangenode can be used to force a color threshold on the mask texture or value.
Material Functions encapsulate shading flow graphs (material blueprints) into reusable shading nodes that have their own inputs and outputs.
This allows development of custom shading nodes, and saving the time it takes to recreate the same flow graphs multiple times or even copy and paste material flow graphs.
Common shading processes and operations that have to be performed in many different materials, and even multiple times in a single material can be defined as a Material Function for quick and easy re-usability. Material functions can also be used to encapsulate a full material blueprint with a Material Attributes output. this provides a convenient workflow for blending different materials together.
In this post I’ll detail the steps needed to create and use a Material Function.
The Material Function example we’ll create, called “ColorAngleBlend” performs a commonly needed shading operation of blending 2 colors or textures according to the surface viewing angle (facing ratio).
The ColorAngleBlendMaterial Function will have the following inputs:
color a:
The color or texture appearing when viewing the surface at perpendicular angle.
color b:
The color or texture appearing when viewing the surface at grazing view angle.
curve exponent:
The steepness of the blend curve between the colors, 1 being a linear blend and higher values displaying color a at more angles “pushing” color b to be seen only at grazing angle.
base color blend:
The percent of color b seen at perpendicular view angle.
normal:
bump normals input.
The final “ColorAngleBlend”Material Function Blueprint:
* The internals of the “ColorAngleBlend”Material Function
An example of the “ColorAngleBlend”Material Function node used to create a reach view-angle dependent color blend for a steampunk metal material:
An example of the “ColorAngleBlend”Material Function node used to create a reach color for a car-paint material:
An example of the “ColorAngleBlend”Material Function node used to create a washed-out effect for a cloth material:
Steps for creating the “ColorAngleBlend” Material Function:
In the content browser, create a Material Function Object and name it “ColorAngleBlend”:
Double click the ColorAngleBlend Material Function to open it for editing:
Click the background of the work space to deselect the Output Result Node,
So that the Details panel on the left will display the Material Functions‘s properties.
Type a description into the Description field, check the Expose to Library option so that the new Material Function will be available to all materials in the Palate and node search, and define in which node categories it should appear:
Select the Output Result node and in the Details panel on the left set its output name to “color”:
Add a Linear Interpolate (Lerp) node, a Fresnel node and a Transform Vector (Tangent space to World space) node to the Blueprint and connect the nodes like this:
* The Lerp node will blend the 2 color inputs with the Fresnelproviding view angle data as the alpha for the Lerp.
The Transform Vector node is needed to convert normal (bump) input to world space for the Fresnelnode.
Adding function inputs:
Create 2 Function Input nodes, in their Details panel, name them “color a” and “color b”, leave their Input Type as default Vector3D, check the option Use Preview Value as Default, number their Sort Priority parameters 0 and 1 to make them appear as the first inputs of the ColorAngleBlend node as it will appear when used in a material, and connect them to the Lerp node’s A and B inputs:
Adding function inputs:
Create 2 new Function Input nodes, name them “curve exponent” and “base color blend”, this time set their Input Type to Scalar, check the option Use Preview Value as Default, set their Sort Priority parameters to 2 and 3 and connect their outputs to the Fresnel node’s ExpoentIn and BaseReflectFractionIn inputs:
Adding function inputs: Create the final Function Input node, name it “normal“, set its Input Type to Vector3D, check its Preview Value as Default option, set its Sort Priority to 4, and connect its output to the Fresnel node’s Normal input:
Adding default inputs:
Finally, add constant nodes to serve as default input values for the Material Function.
A pure white Constant3Vector (color) constant as the default value for “color a” input,
A pure black Constant3Vector (color) constant as the default value for “color a” input,
A Constant with value 1.0 as the default value for “curve exponent” input,
A Constant with value 0.0 as the default value for”base color blend” input,
A pure blue Constant3Vector (color) constant as the default value for “normal” input. > Tip for quick creation of constant value nodes
Save the new Material Function.
To use the new ColorAngleBlend Material Function create a new material, in the node search start typing color… to locate the ColorAngleBlend node and create it, and connect it to the desired material input.
>Material Functions can also be used by dragging them from the Content Browser into the Material Blueprint.
Having to remap a value range is very common in designing shaders, whether it’s to perform a traditional “levels” operation on a texture, or use just a specific range of values in a float input.
The RemapValueRange node let’s us do just that. this node has 5 inputs:
Input: The input value
Input Low: Input mapping range minimum
Input High: Input mapping range maximum
Target Low: Output range minimum
Target Height: Output range maximum
Mono Noise examples:
The original noise pattern:
Mapping input 0 -> 1 to output 0 -> 1 obviously has no effect:
Mapping input 0 -> 1 to output 0.3 -> 0.7 reduces the pattern contrast:
Mapping input 0.3 -> 0.7 to output 0 -> 1 increases the pattern contrast:
Mapping input 0 -> 1 to output 1 -> 0 inverts the pattern:
In this example RemapValueRange nodes are applied to a texture’s individual color channels to increase contrast (Levels): > Note that this operation can be performed using a simpler graph by using float3d adding and multiplication operations on the texture color (this will be a subject for a different post) > Note that a different remapping operation can be performed on each color channel of a texture to adjust its color balance.
Before the value remapping:
After the value remapping tha value in each channel 0.1 -> 0.9 to 0.0 to 1.0:
The same operation performed by multiplication by 1.2 and subtracting 0.1:
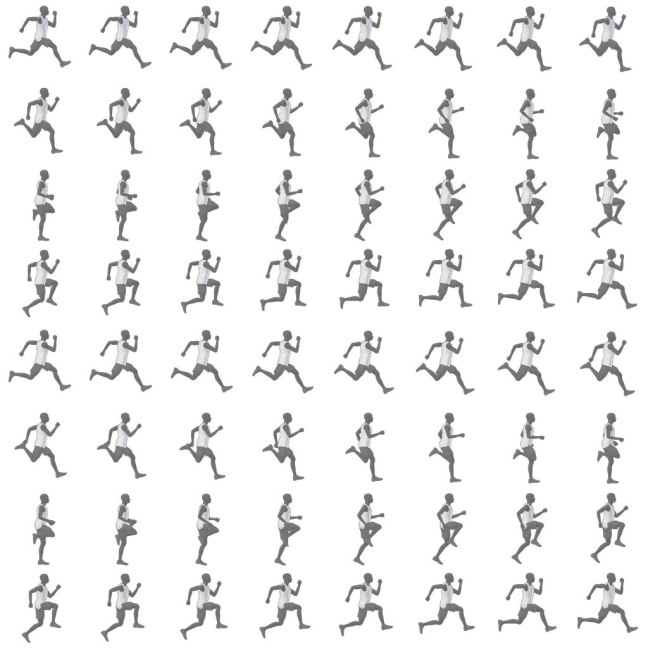
A ‘Flip Book’ node in UE4 is the way to create an animated texture using a Sprite-Sheet.
Its very simple to use:
Import a Sprite Sheet texture containing the animation frames.
In the UE4 Material, Create a Texture Object node, and set it’s Texture property to be the Sprite Sheet texture you imported.
Create a Flip Book node and connect the Texture Object Node to its Texture input.
Connect numeric value constants to the Flip Book node’s Number of Rows and Number of Columns inputs to set the layout of the Sprite Sheet.
Connect the outputs of the Flip Book node to the wanted material inputs.
The following example shows a way to create a custom Flip Book material to animate textures. Q: Why would you do that???
A: Well the truth is I created it without knowing there is a built-in option, and found out about the Flip Book node right after I finished my own.. 😀
But it’s also a useful example of locating tile coordinates within a plane..
The UE4 Fresnel node is actually a “Facing Ratio” node (aka Perpendicular / Parallel) with some extra control.
It basically allows controlling material effects according to the incident angle the surface is viewed at, which is a hugely important feature for designing advanced material effects.
Exponent:
The steepness of the value / angle curve.
Base Reflect Fraction:
The value at perpendicular angle.
Normal:
An option to connect World Space surface normals input to affect the output of the Fresnel node.
* Tangent Space normals must be converted to World Space by using a Transform Vector node.
Note:
A value of 1.0 for the Exponent parameter, and a value of 0.0 for the Base Reflect Fraction will produce a linear “Facing Ratio” (“Perpendicular / Parallel”) falloff blend.