Cycles Tangent node & Anisotropic reflection

Software:
Blender 2.82

The Cycles Tangent node defines a Tangent-Space for a mesh by either using one of the object’s local axes (see image A) or by using an available UV layout.
This can be useful when designing an Anisotropic reflection shader like in the case of brushed, machined or lathed metals.
A grey-scale texture can be connected to the Rotation input of the shader to define changes in the Anisotropic direction on the surface (see image B).

Examples:

A. In this example the Tangent node is set to ‘Radial’ Direction mode, in which a object axis is chosen as the radial axis of the Anisotropic direction:
Annotation 2020-05-07 132452

B. In this example a Noise texture’s Factor output is connected to the Anisotropic shader’s Rotation input to create an irregular Anisotropic (metal brushing finish) direction:

Annotation 2020-05-07 133126


Related:

  1. Adding a texture to an Area Light
  2. Using the normal’s blue channel to create top-side effects
  3. Nested transparencies

Blender – Set Origin (pivot point)

Software:
Blender 2.79

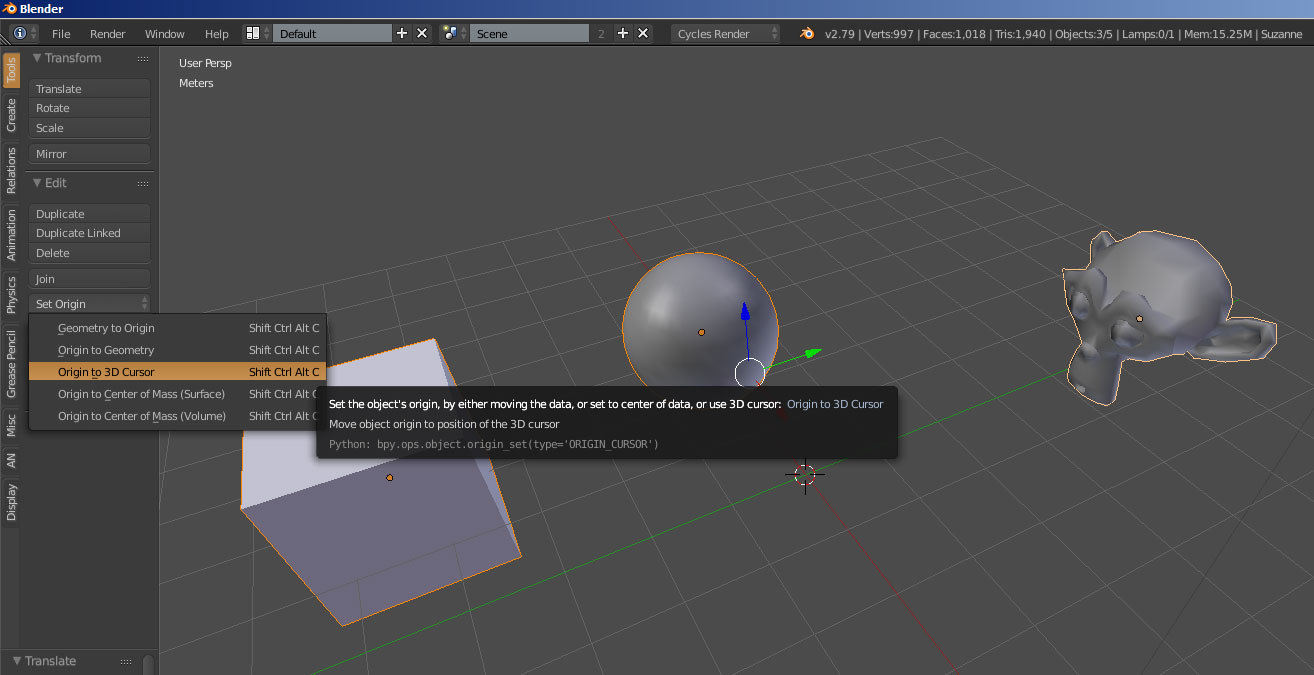
The Set Origin Tool let’s you set the origin (pivot) for one or multiple objects.
Typical usage would be to place the 3D Cursor at the wanted location and choose Origin To 3D Cursor.
Another handy usage is after “breaking” a model into separate meshes, like separating the letters of a title for animation, selecting all the letters and choosing Origin to Geometry to set all the letters origins to their centers.

3D View > Tools panel > Set Origin

Hotkey:
Shift + Ctrl + Alt + C

Untitled-1

Configuring Blender for faster object selection in large scenes

Software:
Blender 2.79

In large scenes, selecting objects becomes slow.
There’s a frustrating lag and the software hangs between the time you Right-Click an object in the view-port, and the time it gets selected.
* especially if there are a lot of mesh surfaces behind it in the view-line of the mouse cursor.

The Systems settings shown below can dramatically improve this.
* You need a GLSL capable video card.

Untitled-1

Basic Toon Shading in Blender & Cycles

Software:
Blender 2.79

  1. Set a Toon BSDF as your model’s material.
  2. Activate the Freestyle option in the Render Settings, and set Line Thickness,
    * More line style settings are found in the Render Layers settings.
    * Freestyle lines are only rendered in the final render (F12) and are not rendered in the Cycles viewport interactive render mode.

Minimal Toon setup:Untitled-2.jpg

A more controllable setup:
2 Toon BSDF’s, one for color shading and one for highlights added together, and a Background shader override to control shaded area darkness:
Untitled-1

Blender – Automatically set fake user to items appended form another blend file.

Software:
Blender 2.79

When appending items from a different blend file,
Check the Fake User option to automatically set a Fake User to the items.

This means that appended items that are not used within the file will not be deleted when closing it.
It’s useful for times when you append a whole library of materials or other assets into a file, so that you don’t have to make use off all of them before saving and closing, and they will still be available in the file the next time you load it.
In other words, you wont need to append the assets again the next time if you didn’t make use of them..

Untitled-1

Measure Distance & Angle in Blender

Software:
Blender 2.79

To create and edit measurement Rulers & Protractors:

  1. In the Tool Shelf > Grease Pencil,
    Press Ruler/Protractor to activate Ruler/Protractor mode.
  2. LMB Click & Drag the 3D Viewport to create a measuring Ruler.
    * Hold Ctrl while creating the Ruler to snap its start and end points to 3D elements.
    * If a one or more measuring Rulers already exist, Ctrl must be held anyway to create a new Ruler.
  3. LMB Click & Drag along an existing Ruler line to turn it into a Protractor for angle measurement.
    * Hold Ctrl while creating the Protractor to snap its apex to 3D elements.
  4. LMB Click & Drag a point in an existing Ruler or Protractor to change its location.
  5. LMB Click an existing Ruler or Protractor and Press Delete to delete it.
  6. When finished creating measurement Rulers & Protractors,
    Press Enter to save them for later use of the Ruler/Protractor mode,
    Or Press Escape to discard them (without discarding Rulers / Protractors that were previously saved).

Untitled-1

AAA

2


To Delete all Ruler / Protractor data:
In the Properties Panel > Grease Pencil Layers,
Delete the RulerData3D Layer.

Untitled-2

Cycles Light (Shadow) Sampling

Software:
Blender 2.79

By default, in Path Tracing Integrator Mode, Cycles traces one ray randomly between all lights (per each camera – AA sample).
So if some lights in the scene are more important than others this will cause inefficient light sampling.
* Especially if there are a few important lights and many unimportant ones.

Light sampling can be set per light by switching the Integrator Mode to Branched Path Tracing, making sure Sample All Direct Lights is checked, and the setting the number of samples per light in the light parameters.
* The option to set the number of samples at the light parameters is only available in Branched Path Tracing Mode.

Untitled-2

In the example below there are 3 lights.
The light on the right has 64 a samples per AA sample, while the 2 other lights have just 1 sample.

Untitled-1.jpg

More on Cycles sampling:
https://docs.blender.org/manual/en/dev/render/cycles/settings/scene/render/integrator.html#sampling

Animating the sample settings in Cycles

Software:
Blender 2.79

A quick Cycles rendering tip:

There are situations in which we need to render an animation with changing lighting complexity, and as a result, parts of the animation need more samples than others to be effectively rendered.
For example when the camera starts it’s movement on the outside in an exterior scene, and moves into an interior space like house or a cave, or a vehicle, in many cases, the exterior part of the animation can be rendered with much less samples than the interior part.

In such cases, rendering the whole animation with the higher sample settings will demand unneeded render time in the simpler parts of the animation.

One possible solution would be to simply render the animation in two separated render jobs with different sampling settings, one for the less demanding part and another for the more complex part and than append the two parts in an editing / compositing software. but that requires more work on the shot, more management etc.

A simple solution is to animate the sample settings in Cycles.
Make tests at different times along the animation to determine how many samples are needed at each part, and key-frame the settings accordingly.

AnimateSamples