Creating a camera animation in UE4

Software:
Unreal Engine 4.18

  1. Create a Camera Actor:
    Cinematics > Cine Camera Actor
  2. Create a new Level Sequence:
    Right Click the Content Browser background and choose Animation > Level Sequence.
  3. In the Content Browser, Double Click the new Level Sequence to open it in the Sequencer.
  4. press ‘+ Track’ and choose Camera Cut Track.
  5. In the camera track press ‘+ Camera’ and choose the Camera Actor you created.
  6. press ‘+ Track’ and choose Transform.
  7. Move the Time-Slider to the motion start time, move the camera to its starting position and orientation, and press the little ‘+’ button at the right of the Transform track <- + -> to set the first Key-Frame for the camera movement.
  8. Move the Time-Slider to the motion end time, move the camera to its ending position and orientation, and press the little ‘+’ button at the right of the Transform track <- + -> to set the last keyframe for the camera movement.
  9. Repeat this to create more Key-Frames and develop the camera motion.
  10. Press the Clapperboard button to open the Render Movie Settings,
    Choose the file format, frame rate, resolution, and save location and press Capture Movie.

Untitled-0.jpgUntitled-1Untitled-2Untitled-3Untitled-4Untitled-5Untitled-6Untitled-7


Related:

  1. UE4 – Playing an Animated Level Sequence
  2. UE4 – Packaging a project for Windows
  3. UE4 – 3ds max & V-Ray Datasmith workflow


Create a richly colored metallic surface in UE4

Software:
Unreal Engine 4.18

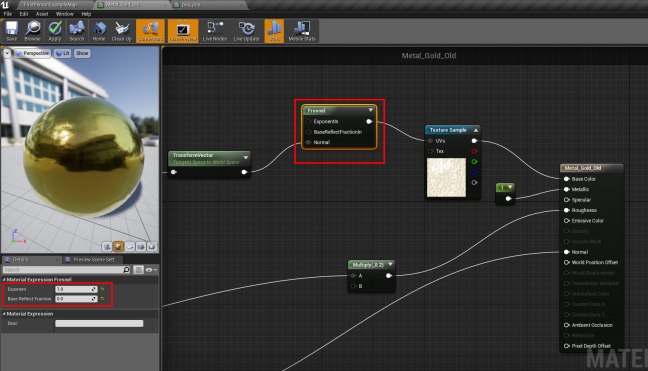
One of the optical properties of many metallic surfaces is changing it’s color slightly as the surface viewing angle changes.
This effect can be simply created using a Fresnel node and a color-ramp texture.

Untitled-4

  1. Create a metallic material (metallic value of 1.0).
  2. Use an image editing software to create a linear color ramp texture (gradient) of the color change per viewing angle from left to right. like this example for a golden metal, and import it to your project.
    Ramp_Gold
  3. Add the ramp texture to the material Blueprint, and connect it to the material Base Color Input.
  4. Create a Fresnel node and set its Exponent value to 1.0 and its Base Reflect Fraction to a value of 0.0 so it will provide a linear angle blend value.
  5. Connect the Fresnel node’s output to the UVs input of the ramp texture node.
    * the reason the Fresnel node can be providing both the X and Y texture coordinates is that the texture’s Y dimension provides the same color for all values anyway.

Note:
When the Metallic property of an Unreal Engine material is set to 1.0, the material automatically simulates the metal’s color fading to white at parallel surface viewing angle (the sides) like it should.
So using a Color Ramp Texture like in this example creates an amplified effect.
* Simply put: You don’t have to have the Color Ramp fade to white on the right side of the texture..

Untitled-4

Untitled-3

Basic architectural glazing material in UE4

Software:
Unreal Engine 4.18

  1. Create a new material, and double click it to edit it.
  2. In the Details panel, under Material, set Blend Mode to Translucent.
  3. In the Details panel, under Translucency, set Lighting Mode to Surface Translucency Volume.
  4. Set Base Color to White.
  5. Set Metallic to 1.
  6. Set Roughness to 0.
  7. Create a Fresnel node and connect it to the Opacity input.
  8. In the Fresnel node, set Base Reflect Fraction to control reflection amount in perpendicular surface viewing angle (front).
    * Note that its connected to Opacity, but since the material is basically a flat mirror, when it’s not purely transparent it will be reflective.
  9. In the Fresnel node, set Exponent to control the reflection amount falloff curve from perpendicular surface viewing angle (front) to parallel surface viewing angle (sides).
    * Higher values will create a steep falloff curve, resulting in less reflection in most viewing angles.

Untitled-3


Related:

  1. 3ds max & V-Ray to UE4 Datasmith workflow
  2. UE4 – Material Fresnel Node
  3. Understanding Fresnel Reflections

Material Parameters and Instances in UE4

Software:
Unreal Engine 4.18

Material Parameters and Material instances allow you to create a customizable material template that can be easily reused with variations across the project.
In the Parent Material, you define the parameters that will be exposed for tweaking in the Material Instances.
Changing the Parent Material will affect all its instances.

Defining customizable parameters in the Parent Material:

  1. Create 3Vector Constant. (press 3 and left click the blueprint background)
    * Parameters can also be created with other types of data like a Constant or a Texture Sample and more.
  2. Right click the 3Vector node you created and choose Convert to Parameter.
  3. In the Details Panel, name the parameter.

Untitled-1

Untitled-2


Creating the Material Instance:

  1. Right click the Parent Material and choose Create Material Instance.
  2. Name the Material Instance.
  3. Double click the Material Instance to edit it.
  4. In the Details panel, under Parameter Groups you will be able to edit the exposed parameters and create a variation of the material.

Untitled-1

Untitled-2


Related:
Material Functions
Blending Materials

Unreal Engine 3D viewport navigation

Software:
Unreal Engine 4.18

LMB Drag – move horizontally on the X Y plane.

MMB Drag – move on the viewing vertical plane (to the sides and up / down ).

RMB Drag – Rotate (Pan) the view without moving.

Alt + LMB Drag – Arc Rotate view

Alt + RMB Drag – Dolly In / Out view (move forward and back ward along viewing axis)

F – Frame Selection (Zoom Extents)

UE4 Sequencer – Scaling keys (stretching animation time)

Software:
Unreal Engine 4.25

  1. Right click the animation track (the space between the keys), and in Properties, unlock the Section range Start and Section Range End properties to make the section time finite so it can be scaled.
    * You can also set custom start and end time for the section.
    The Track (the green range) will now be finite, containing the keys.
  2. Ctrl + Drag the end of the track to scale it including the keys.

Scale_Keys


Related posts:

  1. UE4 – Creating and rendering camera animations
  2. UE4 – Creating and playing a Level Sequence


UE4 – Create a Billboard (Sprite)

Software:
Unreal Engine 4.18

  1. Create a new Blueprint Actor.
  2. Enter the Actor Editor and add a‘Billboard’ component to it.
  3. In the Billboard’s Details panel, under ‘Sprite’, select the Billboard texture.
  4. In the Billboard’s Details panel, under ‘Rendering’, Uncheck ‘Hidden In Game’.

Untitled-2.jpg

UE4 Actor Blueprint – Referencing another Actor instance

Software:
Unreal Engine 4.18

A direct reference to another actor instance can’t be created from within the blueprint because it can only be provided at run-time after the instances have been created, both the current actor and the other actor we want to refer to.

In the Actor Blueprint:

  1. Add a new variable of type Actor > Object Reference
  2. Make the variable public and editable in the editor (the eye button..)
  3. Hit Compile and Save.

In the Map Editor:

  1. Place both actors in the map and save it.
  2. Select the actor in which you created the reference variable.
  3. In the Details panel, set the Actor property you created to the wanted other Actor instance.

Untitled-7.jpg

Untitled-7.jpg