UE4 – Connect a Directional Light to an Atmospheric Fog effect

Software:
Unreal Engine 4.21

UE4‘s Directional Light mimics sun lighting and shadow fairly realistically,
And the Atmospheric Fog visual effect produces a realistic clear sky background that includes the sun’s disk image in the sky.
> The Atmospheric Fog produces a result similar to an implementation of a Preetham physical sky model in common rendering software.

Combined together, these two elements can produce an effective day-light system,
But inorder for this to work the sun’s direction should be controlling the time of day simulated by the Atmospheric Fog.

For the Directional light to control the Atmospheric fog:
In the Directional Light’s details, under light, expend the settings and enable:
Atmosphere / Fog Sun Light

Note:
There is a limitation to this setup’s realism because the sunlight’s color shouldn’t be pure white, but rather yellowish, to orange, depending on the time of day (you can find tables of the sunlight’s color temperature for various time of day on the web)
There is no problem setting the sun’s color, but the problem is that it causes additional coloring of the Atmospheric Fog which isn’t needed since it already is simulating the sky’s color correctly.
The result of this limitation is that we can see a sunset sky with a white sunlight which is wrong.
I didn’t find a workaround for this yet, can’t find a way to set the Atmospheric Fog‘s sun vector without connecting it to a Directional light and can’t find a way to make the Directional Light‘s color not affect the Atmospheric Fog‘s color.

Update:
It seems this limitation can be overcome by disconnecting the Atmospheric Fog from the Directional Light and using the Atmospheric Fog Object’s rotation to control it.

Directional_light_Affect_Atmo_Fog
atmo_fog.gif

Related:

  1. UE4 HDRI Lighting
  2. 3ds max & V-Ray to UE4 Datasmith workflow
  3. Unreal – Architectural glass material
  4. Unreal – Camera animation

UE4 – Enable complex collision for models

Software:
Unreal Engine 4.21

By default UE4 uses fast simplified convex collision shapes to calculate collision for static mesh actors.
This means that the player or projectiles wont be able to path through holes, openings or doors in the model.

To set complex (concave) collision for a static mesh model:

In Static Mesh editing window, in the details pane, under Collision:
Set Collision Complexity to: Use Complex Collision As Simple

Static_Mesh_Complex_Collision.jpg

This example shows the default behavior for a model that has an opening, neither the projectiles nor the player can pass:

Simple_Collision.gif

In this example collision for the model was set to Use Complex Collision As Simple:

Complex_Collision.gif


UE4 – Python – Importing assets

Software:
Unreal Engine 4.20

Untitled-1

Importing assets into a project is done using the import_asset_tasks() function which is a member of the unreal.AssetTools class.
A reference to the AssetTools class is created by calling the get_asset_tools() function which is a member of the unreal.AssetToolHelpers class.
The import_asset_tasks() function requires a list of unreal.AssetImportTask objects as an argument, each unreal.AssetImportTask object in the supplied list represents the import action of a single asset, and contains properties needed for the import operation.
Asset import properties are set using the set_editor_property() function which is called through the AssetImportTask object.
Available asset import properties are listed here:
https://api.unrealengine.com/INT/PythonAPI/class/AssetImportTask.html

In the following example a specified texture file is imported into the project and stored in the Content(Game) > Textures folder.
* If the folder doesn’t exist it will be created.

import unreal
AssetTools = unreal.AssetToolsHelpers.get_asset_tools()
AssetImportTask = unreal.AssetImportTask()
AssetImportTask.set_editor_property('filename', "D:\Wood_Red_A.jpg")
AssetImportTask.set_editor_property('destination_path', '/Game/Textures')
AssetTools.import_asset_tasks([AssetImportTask])

The following example imports all the JPG files from folder: D:\ into the project, stores the new assets in Content(Game)\Textures folder and saves them:

from os import listdir
from os.path import isfile, join
import unreal
dir = "D:\\"
files = [f for f in listdir(dir) if isfile(join(dir, f)) and f[-3:]=='jpg']
AssetTools = unreal.AssetToolsHelpers.get_asset_tools()

import_tasks = []
for f in files:
     print join(dir, f)
     AssetImportTask = unreal.AssetImportTask()
     AssetImportTask.set_editor_property('filename', join(dir, f))
     AssetImportTask.set_editor_property('destination_path', '/Game/Textures')
     AssetImportTask.set_editor_property('save', True)
     import_tasks.append(AssetImportTask)

AssetTools.import_asset_tasks(import_tasks)

* note that when copying and pasting a script from this example, the indentation may not be pasted correctly.

Related:

  1. Get started with Python in UE4
  2. Setting actors locations

UE4 – Python Scripting – how to start

Software:
Unreal Engine 4.20

  1. Go to:
    Edit > Plugins > Scripting
    And enable the Python Editor Script Plugin.
    * also recommended to enable Editor Scripting Utilities,
    And Sequencer Scripting plugins
    Untitled-2
  2. Restart the UE4 Editor.
  3. Open:
    Window > Developer Tools > Output Log
    Untitled-1
  4. Switch the command-line mode from Cmd to Python, write Python commands and press Enter to execute them:
    Untitled-3
  5. Or in Cmd mode, write ‘py‘ with a path to a Python script file, and hit Enter to execute the script:
    Untitled-4.jpg


Links:

  1. Scripting the Editor using Python:
    https://docs.unrealengine.com/en-us/Editor/ScriptingAndAutomation/Python
  2. UE4 Python API reference:
    https://api.unrealengine.com/INT/PythonAPI/


Examples:

  1. Importing assets
  2. Placing actors

V-Ray Next’s PBR’ness

Software:
3ds max 2019 | V-Ray Next

A quick test of V-Ray Next‘s PBR* workflow,
Namely designing materials while previewing them using V-Ray,
Defining the material properties using the new (to V-Ray) Metalness attribute, and using Roughness rather than Glossiness, shows good results IMO.

* It should be noted that although we got used to referring to the base-color / metallness / Specular material interface as “PBR”, it is actually a principled material interface developed by Disney animations studios.

Results are generally consistent through Blender & Cycles, Maya & Arnold, and UE4.

Untitled-1.jpgUntitled-3

Untitled-4

Untitled-2


Related Posts:

  1. V-Ray Next – Metalness
  2. Metal In UE4
  3. Fresnel Reflections

UE4 – Bump Map

Software:
Unreal Engine 4.21

To use a ‘Bump Texture’ in UE4, or in more geeky terms, derive Normal data from a supplied height map, use the NormalFromHeightMap Node.

Notes:

  1. The height map textured is supplied via Texture Object node and not Texture Sample, and is connected to the NormalFromHeightMap‘s Height Map input.
  2. A numeric vale is connected to the NormalFromHeightMap‘s Normal Map Intensity input to control the intensity of the resulting Normals/Bump.
  3. UV coordinates for the bump map should be connected to the Coordinates input of the NormalFromHeightMap node.

bump

Related:
UE4 – Procedural Bump Normals
UE4 – fix an inverted normal map
UE4 – Triplanar mapping

UE4 – Animated texture using a Flip-Book node

Software:
Unreal Engine 4.18

AAA.gif

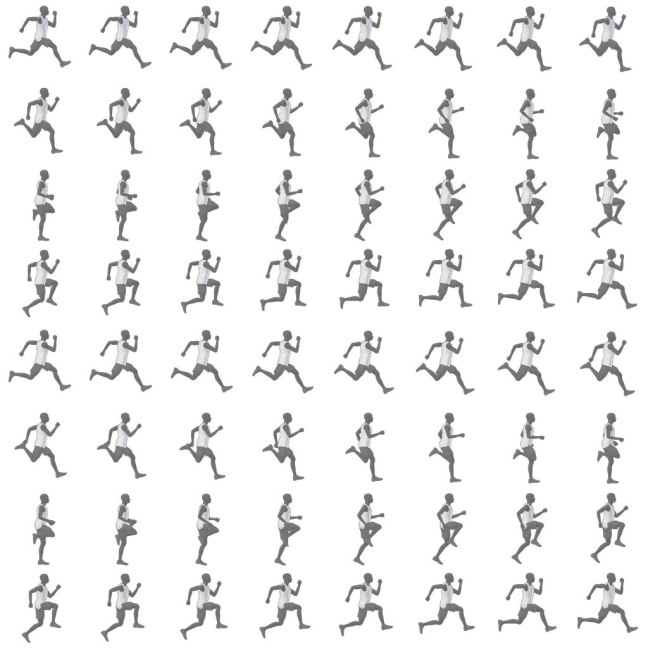
A ‘Flip Book’ node in UE4 is the way to create an animated texture using a Sprite-Sheet.
Its very simple to use:

  1. Import a Sprite Sheet texture containing the animation frames.
  2. In the UE4 Material, Create a Texture Object node, and set it’s Texture property to be the Sprite Sheet texture you imported.
  3. Create a Flip Book node and connect the Texture Object Node to its  Texture input.
  4. Connect numeric value constants to the Flip Book node’s Number of Rows and Number of Columns inputs to set the layout of the Sprite Sheet.
  5. Connect the outputs of the Flip Book node to the wanted material inputs.

Runner_Atlas

Untitled-1

The following example shows a way to create a custom Flip Book material to animate textures.
Q: Why would you do that???
A:
Well the truth is I created it without knowing there is a built-in option, and found out about the Flip Book node right after I finished my own.. 😀
But it’s also a useful example of locating tile coordinates within a plane..

Untitled-2.jpg


UE4 Blueprint Delay node

Software:
Unreal Engine 4.18

Untitled-1

The Delay node serves as a timer that will execute the connected blueprint after a predefined time in seconds.

An example of usage could be triggering a game event at a set time after the player entered a location.
You can use random values or other expressions connected to the Duration input to create a richer and less predictable interaction.

UE4 – Enable input for a Blueprint

Software:
Unreal Engine 4.18

By default, Blueprint Actors are set not to receive player input.
* If every Blueprint would be listening to player input events it would hurt game performance.

To enable input events for a Blueprint:
In the Blueprint’s Event Graph,
Connect an Enable Input node to the BeginPlay Event,
Create a Get Player Controller node and connect it to the Player Controller parameter of the Enable Input node to set which player input events to listen to.

Untitled-1.jpg