Simple Toon shader setup in Maya & Arnold

Software:
Maya 2018

Use a Surface Luminance node as a V coordinate input value for a Ramp (V Ramp) node containing the toon colors.

* Note that the Clamp node is important so results will be ass expected, it clamps the Surface Luminance values to 0.99 so the V coordinate will nor cycle back to the beginning of the Ramp.

Untitled-1.jpg

Related:
Toon Shading in V-Ray for Maya

Arnold for Maya Motion-Blur

Software:
Maya 2018 | Arnold 5

  1. In the Render Settings window, Arnold Renderer tab, under Motion Blur,
    Check ‘Enable’.
  2. Set the ‘Length’ attribute to set the Motion-Blur size.
    * the default length of 0.5 means the Motion-Blur will be calculated as a result of a photographic exposure duration of half of a frame duration, or 180 degrees in cinema camera terminology.
  3. Raise the number of Keys to accurately simulate Motion-Blur for very fast rotational motion like helicopter propellers and car wheels.

Untitled-2.jpg

Note:
To generate a Motion Vector (Velocity) AOV (also referred to as ‘Render Element’ or ‘Pass’), in order to add the Motion-Blur effect in a compositing software:

  1. The ‘motionvector’ AOV must be added to the AOVs list in the AOVs tab of the Render Settings window.
  2. Motion-Blur must be enabled in the Motion-Blur part of the Arnold Renderer tab in the Render Settings window.
    * Otherwise motion vectors will not be calculated.
  3. In the Diagnostics tab of the Render Settings window, under Feature Overrides, check ‘Ignore Motion Blur’, so Motion-Blur will not be rendered.

Untitled-2

Untitled-3


Related posts:

Arnold for Maya Depth of Field (DOF)

Saving multi-channel EXR file with Arnold for Maya


Saving multi-channel EXR with Arnold for maya

Software:
Maya 2018 | Arnold 5

  1. In the Render Settings > Common tab, choose EXR as the output file format.
  2. In the Render Settings > AOVs tab, open the drop-down menu on the right side of one of the AOVs in the list, and choose Select Driver.
    This will bring up the defaultArnoldDriver node Attributes.
  3. In the defaultArnoldDriver node Attributes, under Advanced Output, check Merge AOVs.

Untitled-4

Untitled-3


Rendering an animation in Maya and Arnold

Software:
Maya 2018 | Arnold 5

  1. Set a Project Folder or Image output path.
  2. In the Render Settings > Common tab, set the output file format, and in Metadata, set Frame/Animation ext. select an option that isn’t Single Frame.
    * This will make the Frame Range settings available.
  3. Set the Frame Range.
  4. Set the Maya UI to Rendering and choose Render > Render Sequence.

Untitled-1

Untitled-2

Texture Color-Space in Maya

Software:
Maya 2018

Along with the Filtering Type, and the File Path attributes,
The File Attributes for texture nodes in Maya have the option to set a Color-Space with which to interpret the color values stored in the file’s pixels.
For example, JPG and PNG files will be interpreted as sRGB Color-Space by default, which means the color values will be ‘linearized’ (their Gamma Correction will be removed), and EXR or HDR files will be automatically interpreted as ‘Raw’ (linear) Color Space.

When an sRGB file like a PNG is intended to serve as linear data, and not as image display. it’s sometimes needed to set its Colors Space attribute to Raw. this is usually the case with Bump maps and Normal maps.

Equivalent setting are also found in other  3D software, see Blender Texture Color Space.

Untitled-2.jpg

Arnold for Maya Depth of Field (DOF)

Software:
Maya 2018 | Arnold 5

Untitled-2.jpg

  1. In the camera shape node’s Arnold Attributes:
    Check ‘Enable DOF’.
  2. Set ‘Aperture Size’ and ‘Focus Distance’ to control the effect.
    Note:
    The Aperture Size attribute isn’t an f-number aperture like we would expect in photography but a radius in world units.
    Larger Aperture Size values (larger lens Iris opening), and shorter Focus Distances will cause a narrower Depth of Field which will result in the background appearing more blurry.
    DOF is generally more apparent with ‘long lenses’ (shorter focal length).
  3. Set other Aperture attributes like the number of blades and aspect ration to further design the appearance of out of focus areas and especially highlights.
    * The optical effect referred by the term ‘Bokeh’ in photography.


Related Posts:

Arnold for Maya Motion-Blur

After Effects Camera Lens Blur

Arnold for Maya Standard Surface Shader Translucency / Paper Shader

Software:
Maya 2018 | Arnold 5

Translucent
In this example, the lamp shade has a Translucent material

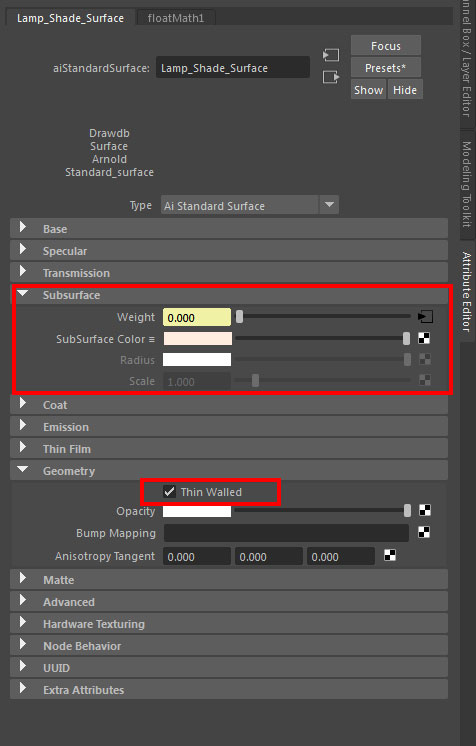
The Subsurface component of the Arnold Standard Surface shader (aiStandardSurface) controls Sub Surface Scattering (SSS).
When the ‘Thin Walled’ option is checked in the Geometry attributes of the shader, the Subsurface isn’t rendered as a full volume of material like soap or skin/flesh (the effect that is traditionally called Subsurface Scattering – SSS) but as a thin paper-like translucent surface like paper, thin cloth thin leaves, lamp shades etc. (the effect traditionally called Translucency or ‘Paper Shader’)

* Note that this option is suitable mainly for polygon surfaces without thickness (just one side)

Untitled-1

To create a Translucent shader with Arnold:

Subsurface Weight must be higher than 0.0 for the effect to be computed.

In Geometry, check Thin Walled for the SSS to be rendered as Translucency (Paper Shader).

Extra options:

Use samplerInfo Node Facing Ratio output in Subsurface weight to add realism by changing the weight by angle.

Multiply weave texture with Facing Ratio to simulate fabric translucency.

Untitled-3.jpg

Related:
> Understanding Transparency Render Settings
> Arnold Transmission Scattering
> Arnold Refractive Caustics

Maya – Set render output Files

Software:
Maya 2018

Setting the file output path:

File > Project Window

In the ‘Images’ path,
Click the folder button on the right to set the path

* You can set a general Project folder for more global control of project related file paths

untitled-31.jpg

Setting the file format:

Render Settings > Image File Output

* Click ‘Image Format Options’ for more image file format control

untitled-32.jpg


Displacement in V-Ray for Maya

Software:
Maya 2018 | V-Ray 3.6

Basic Displacement through the shader:

1) Connect a displacement map to the Displacement Shader input of the Shading Group Node.

2) Multiply the value to set the displacement amount.

3) Control Displacement Settings globally through VRay Render Settings:
Edge Length:
The minimum size in pixels for new created edges.
Lower values will create more detailed geometry but cost more memory.

Disp_A.jpg


Per Object Displacement with more controls:

1) Add a VRay Displacement node to the object (See images).

2) Connect Displacement Map

3) For more control, and Local displacement quality settings,
In the Attributes Editor, Add VRay Displacement Control and VRay Subdivision and Displacement Quality attributes to the object (See images).

Disp_B.jpg

Disp_B1.jpg